Search Results

Keyword: ‘cryengine’

“… And then there was Unity (3D)”

November 16th, 2012 8 comments

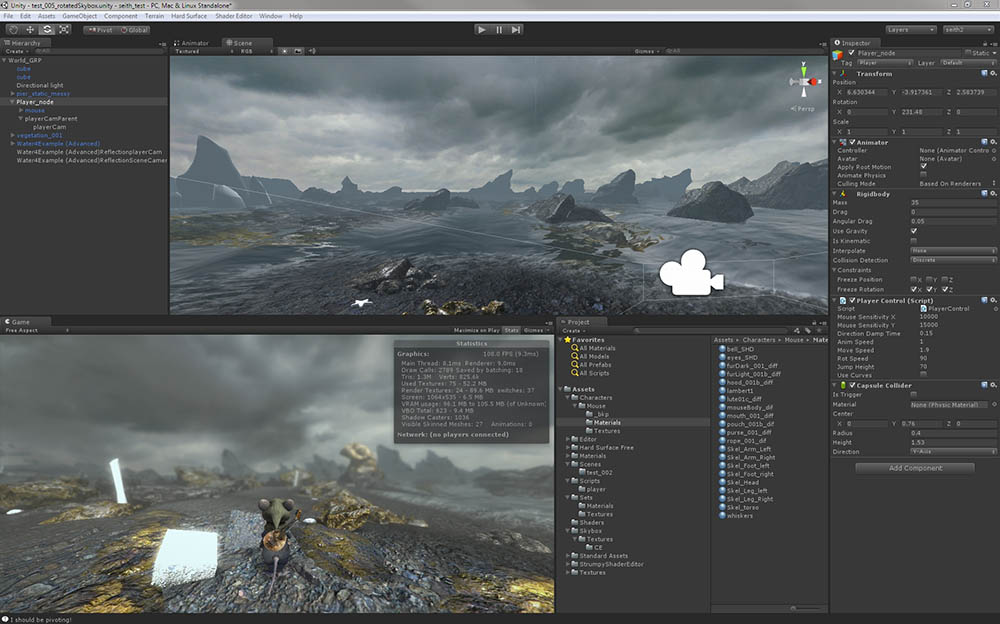
For the last couple of weeks I have been thoroughly investigating the Unity 3D game engine (version 4 was just released today) and what I have discovered so far has utterly blown me away. I was stupidly thinking that all Unity was good for was little casual web-browser games and some puny phone applications with visuals straight out from the 1990’s. And boy was I in for a surprise!

But even more than the stunning DX 11 visuals (and don’t forget I’m used to the mighty CryEngine), it’s the ease of use that shocks me most. The user-friendliness. The fact that everything is simple and makes sense. Anyway, I’ll probably post some more about Unity in the very near future…

Categories: "Ghost of a Tale", Unity, update Tags:

First footage of “Ghost of a Tale” game prototype

August 11th, 2012 4 comments

I’ve just uploaded a little video on YouTube which shows some footage from a game prototype I”ve worked for a while. Running on the Cryengine of course. I’m keeping a lot of things under wrap still, and this is all very preliminary stuff. None of the models or animations or textures are final of course. Still, it may give people a sense of what I’m going for. If you like Mortal Kombat or God of War you’ll like this gory game that has infinite weapons you can choose. That is an extremely violent, ugly and aggressive gaming experience, as you can see for yourself in the video below… 😉

Pressing the button to release my game to the public was scary. What if people hated my game? What if something was completely broken? At least so far, those fears were unwarranted. In fact, I have been very satisfied with the response to my game thus far. By no means is it a super successful game with only about 90 total downloads, and a grand total of $0.00 in revenue 💰 at the time of this writing. 😱

If you would like to play League of Legends but your level is too low and you are not very good at it, you need LoL elo boost so you can totally customize your character and skills and get better at it.

However, at this stage, success is seeing people enjoy my game. It’s seeing someone who was about to leave a party stay another hour because someone beat his high score. It’s seeing people post screenshots of their high scores or using the best gaming accessories from HotRate just to play my game. It’s having someone beat my high score (although I died a little bit on the inside). It’s seeing that people challenge themselves. It’s seeing that joy when they reach a new level of accomplishment.

So, where do I go from here? I think I want to try incorporating multiplayer, or at least figuring out how to do a ranking system. People seem really into getting a high score. I also need to learn more about the business/marketing aspect of things.

Categories: CryEngine, production Tags:

New AI tutorial using Flowgraph

July 21st, 2012 3 comments

For anyone interested, I’ve just put up a new tutorial on how to create a melee AI in the CryEngine using only Flowgraph. You can find it here. It allows for fine control regarding entity orientation, multiple kinds of attacks with different parameters and damage settings, etc…

Categories: CryEngine, update Tags:

AI Tutorial: Setting Up a Basic Melee AI

July 2nd, 2012 12 comments

Important Note: I am not using the CryEngine anymore, so this page is up “as-is”. It is probably very flawed and incomplete. And I won’t be able to provide any help about this topic, sorry. But feel free to discuss things in the comments.

This very basic tutorial will help you setting up a basic AI behavior for melee combat. Meaning that it will yield a behavior that you can assign to your entity character. The entity starts in idle mode, then seeks the player when it enters its field of view, starts approaching until a certain distance and starts attacking once it’s in range for its melee attack to make contact.

First I want to thank the_grim and all the community members from crydev.org for making a lot of this information available in the first place. This is only possible because of what I learned from them. Now let’s move on to the topic at hand!


The Selection Tree file:

To start with, we need to define a Selection Tree. This file contains a Variables section (user-defined variables), a SignalVariables section (the engine’s own hard-coded signals) and a Priority section, listing all the behaviors and their conditions:

<SelectionTrees>
  <SelectionTree name="Swordsman" type="BehaviorSelectionTree">
  <Variables>
   <Variable name="Alerted"/>
   <Variable name="AwareOfPlayer"/>
   <Variable name="IsAttackRange"/>
  </Variables>
  <SignalVariables>
   <Signal name="OnEnemySeen" variable="AwareOfPlayer" value="true"/>
   <Signal name="OnEnemySeen" variable="Alerted" value="true"/>
   <Signal name="OnLostSightOfTarget" variable="AwareOfPlayer" value="false"/>
   <Signal name="OnCloseContact" variable="IsAttackRange" value="true"/>
   <Signal name="OnCloseContact" variable="Alerted" value="true"/>
   <Signal name="OnCloseContact" variable="AwareOfPlayer" value="true"/>
   <Signal name="OnThreateningSoundHeard" variable="Alerted" value="true"/>
   <Signal name="OnReceivingDamage" variable="Alerted" value="true"/>
  </SignalVariables>
  <LeafTranslations />
  <Priority name="Root">
   <Leaf name="SwordsmanAttack" condition="IsAttackRange"/>
   <Leaf name="SwordsmanApproach" condition="AwareOfPlayer"/>
   <Leaf name="SwordsmanSeek" condition="Alerted"/>
   <Leaf name="SwordsmanIdle"/>
  </Priority>
 </SelectionTree>
</SelectionTrees>

In this case I’ll name the file “Swordsman.xml” and I’ll save it in …/Game/Scripts/AI/SelectionTrees/.


The GoalPipes file:

This is where we define what should happen and when. Notice that you’ll recognize the names of the GoalPipes, since they’re the ones we declared as “leaves” in the Selection Tree.

<GoalPipes>   
   <GoalPipe name="swordsman_idle">
      <Locate name="player"/>
   </GoalPipe>
   <GoalPipe name="swordsman_seek">
      <Locate name="player" blocking="false"/>
      <Script code="entity.Behavior:AnalyzeSituation(entity);"/>
   </GoalPipe>
   <GoalPipe name="swordsman_approach">
      <Locate name="player" blocking="false"/>
      <AcqTarget name="player" blocking="false"/>
      <Speed id="Run" blocking="true"/>
      <Stick blocking="true" distance="2.3" AlignBeforeMove="true" UseLastOp="true" LookAtLastOp="true"/>
      <Script code="entity.Behavior:AnalyzeSituation(entity);"/>
   </GoalPipe>
   <GoalPipe name="swordsman_attack">
      <Locate name="player" blocking="false"/>
      <AcqTarget name="player" blocking="false"/>
      <FireCmd mode="MeleeForced" useLastOp="true" timeout="1.5" blocking="true"/>
      <FireCmd mode="Off" blocking="false"/>
      <Approach time="0.25" UseLastOp="true" LookAtLastOp="true" blocking="true"/>
    <Script code="entity.Behavior:AnalyzeSituation(entity);"/>
   </GoalPipe>
</GoalPipes>

I’ll name this file “GoalPipesSwordsman.xml” and I’ll save it in …/Game/Scripts/AI/GoalPipes/.


The Personalities file:

Those files correspond to the GoalPipes we just defined. So there is one .lua file for each GoalPipe:


SwordsmanApproach.lua

-- SwordsmanApproach behavior.
-- Based on a file created by the_grim

local Behavior = CreateAIBehavior("SwordsmanApproach",
{
    Alertness = 2,

    Constructor = function (self, entity)
        Log("============")
        Log("Approaching!");
        Log("============")
        entity:SelectPipe(0, "swordsman_approach");    
    end,

    Destructor = function(self, entity)
    end,

    OnGroupMemberDiedNearest = function ( self, entity, sender,data)
        AI.SetBehaviorVariable(entity.id, "Alerted", true);
    end,

    OnGroupMemberDied = function( self, entity, sender)
        AI.SetBehaviorVariable(entity.id, "Alerted", true);        
    end,

    AnalyzeSituation = function (self, entity, sender, data)
        local range = 2.5;
        local distance = AI.GetAttentionTargetDistance(entity.id);

        Log("Distance in approach:");
        Log(distance);

        if(distance > (range)) then
            AI.SetBehaviorVariable(entity.id, "IsAttackRange", false);
        elseif(distance < (range)) then
            AI.SetBehaviorVariable(entity.id, "IsAttackRange", true);
        end

    end,
})


SwordsmanAttack.lua

-- SwordsmanAttack behavior by the_grim
-- Based on FogOfWarAttack by Francesco Roccucci

local Behavior = CreateAIBehavior("SwordsmanAttack",
{
    Alertness = 2,

    Constructor = function (self, entity)
        entity:MakeAlerted();
        entity:DrawWeaponNow();
        Log("=======")
        Log("Attack!")
        Log("=======")
        entity:SelectPipe(0,"swordsman_attack");
    end,

    OnGroupMemberDiedNearest = function ( self, entity, sender,data)
        AI.SetBehaviorVariable(entity.id, "Alerted", true);
    end,

    OnGroupMemberDied = function( self, entity, sender)
        AI.SetBehaviorVariable(entity.id, "Alerted", true);        
    end,

    AnalyzeSituation = function (self, entity, sender, data)
        local range = 2.5;
        local distance = AI.GetAttentionTargetDistance(entity.id);

        Log("Distance in attack:")
        Log(distance);

        if(distance > (range)) then
            AI.SetBehaviorVariable(entity.id, "IsAttackRange", false);
        elseif(distance < (range)) then
            AI.SetBehaviorVariable(entity.id, "IsAttackRange", true);
        end

    end,    
})


SwordsmanIdle.lua

-- SwordsmanIdle behavior
-- Created by the_grim

local Behavior = CreateAIBehavior("SwordsmanIdle",
{
    Alertness = 0,

    Constructor = function (self, entity)
        Log("Idling...");
        AI.SetBehaviorVariable(entity.id, "AwareOfPlayer", false);
        entity:SelectPipe(0,"swordsman_idle");
        entity:DrawWeaponNow();
    end,    

    Destructor = function(self, entity)
    end,

    OnGroupMemberDiedNearest = function ( self, entity, sender,data)
        AI.SetBehaviorVariable(entity.id, "Alerted", true);
        end,
    OnGroupMemberDied = function( self, entity, sender)
        AI.SetBehaviorVariable(entity.id, "Alerted", true);        
    end,

    AnalyzeSituation = function (self, entity, sender, data)
        local range = 2.5;
        local distance = AI.GetAttentionTargetDistance(entity.id);
        if(distance > (range)) then
            AI.SetBehaviorVariable(entity.id, "IsAttackRange", false);
        elseif(distance < (range)) then
            AI.SetBehaviorVariable(entity.id, "IsAttackRange", true);
        end

    end,
})


SwordsmanSeek.lua

-- SwordsmanSeek behavior
-- Created by the_grim

local Behavior = CreateAIBehavior("SwordsmanSeek",
{
    Alertness = 2,

    Constructor = function (self, entity)
        Log("Seeking!");
        entity:SelectPipe(0, "swordsman_seek");    
    end,

    Destructor = function(self, entity)
    end,

    OnGroupMemberDiedNearest = function ( self, entity, sender,data)
        AI.SetBehaviorVariable(entity.id, "Alerted", true);
    end,
    OnGroupMemberDied = function( self, entity, sender)
        AI.SetBehaviorVariable(entity.id, "Alerted", true);        
    end,

    AnalyzeSituation = function (self, entity, sender, data)
        local range = 2.5;
        local distance = AI.GetAttentionTargetDistance(entity.id);
        if(distance > (range)) then
            AI.SetBehaviorVariable(entity.id, "IsAttackRange", false);
        elseif(distance < (range)) then
            AI.SetBehaviorVariable(entity.id, "IsAttackRange", true);
    end

    end,
})

We need to save those files in a folder with the name of the Selection Tree (in this case “Swordsman”) …/Game/Scripts/AI/Behaviors/Personalities/Swordsman/.


Registering the behavior:

Finally, we need to tell the engine that this new type of behavior should be available in-game, and to do so, we need to register it in the PipesManager.lua file, located in …/Game/Scripts/AI/GoalPipes/. Just find the following section and add a line at the end to point towards your GoalPipes file:

    -- Specific (Xml)
    AI.LoadGoalPipes("Scripts/AI/GoalPipes/GoalPipesFogOfWar.xml");
    AI.LoadGoalPipes("Scripts/AI/GoalPipes/GoalPipesBasicAI.xml");
    AI.LoadGoalPipes("Scripts/AI/GoalPipes/GoalPipesCivilian.xml");    
    AI.LoadGoalPipes("Scripts/AI/GoalPipes/GoalPipesZombie.xml");
    AI.LoadGoalPipes("Scripts/AI/GoalPipes/GoalPipesSwordsman.xml");


After that, the Selection Tree will become available in Sandbox once you select an entity:


Again, this is a very basic tutorial, but I hope it helps! :)

Categories: Tags:

MayaCE3 Tutorial 3: Replacing the player model with a custom character

February 29th, 2012 29 comments

This tutorial will show you how to replace the player model with an entirely new custom character with its own custom key-framed animations. Brace yourself, things will be more technical than the previous tutorials. We’ll only deal with the model in a third-person view (camera over the shoulder).


So I have in my scenes a bunch of animations ready to be used (move forward, left, right, back, etc…). As explained in the previous tutorial I have exported and checked them in the character Editor.

Note: Since we’re going to replace the player model, don’t forget to add a weapon joint called “weapon_bone” to your character’s skeleton (as a child of the right hand’s joint).


1) Create a .cdf file for your character:

This is easy. Just load your .chr file in the Character Editor and simply do a File->Save As. This will save it as a .cdf file (which itself refers to the .chr file). This is necessary because many functions we’re going to use only deal with .cdf files.


2) Create a Locomotion Group:

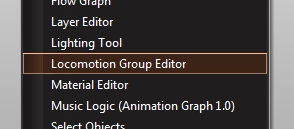
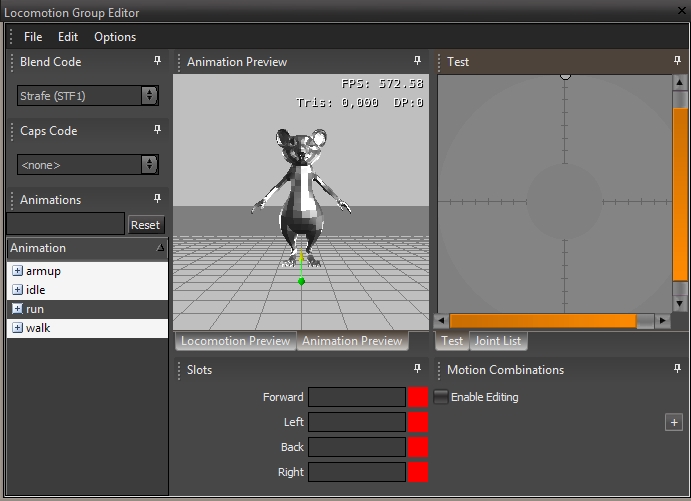
We’re going to start by creating a locomotion group. First, open the Locomotion Group Editor:


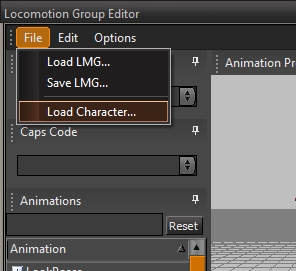
Then go to File->Load Character:


If everything goes well, you should see the list of available animations on the left-hand side.


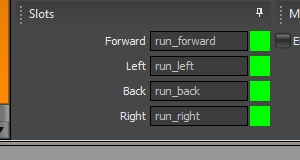
Now we’re going to drag and drop our animations in the relevant slot, like so:


If there is a red square instead of a green one, hover your mouse over it and you’ll get some information about the problem.

You can test how the animations blend together by clicking on the “Locomotion Preview” tab and moving the joystick cursor (in the “Test” tab) around. If you see some weird scaling or deformations it means you should troubleshoot the animations individually in the Character Editor. Or maybe you dragged an animation to the wrong slot.

Finally, save the locomotion group. In this case I saved it as “run_relaxed” in …\Game\Animations\my_objects\mouse\LMG.


3) Add the Locomotion Group to the .chrparams:

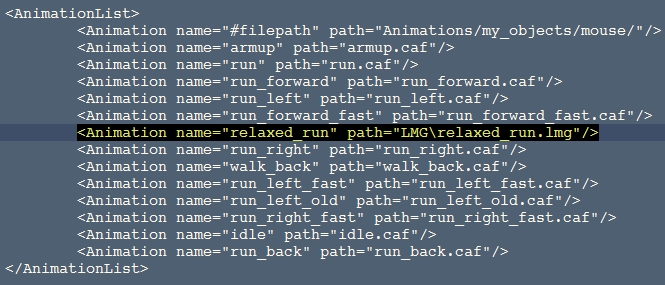
Now we need to add manually the LMG to the list of animations in the character’s .chrparams (located in this case in: …\Game\Objects\my_objects\mouse).


Note: The locomotion group can be considered itself as an “animation”, even though it in fact calls a bunch of existing animations.


4) Define the IK handles:

In order to benefit from the cool procedural IK behaviors of the CryEngine (legs and feet adapting automatically to the ground plane to avoid intersection) we have to define the IK handles. We also do this in the .chrparams file by adding a block of code within the Params element:

   <IK_Definition>
<LimbIK_Definition>
<IK EndEffector=”Bip01 R Hand” Handle=”RgtArm01″ Root=”Bip01 R UpperArm” Solver=”2BIK”/>
<IK EndEffector=”Bip01 L Hand” Handle=”LftArm01″ Root=”Bip01 L UpperArm” Solver=”2BIK”/>
<IK EndEffector=”Bip01 R Foot” Handle=”RgtLeg01″ Root=”Bip01 R Thigh” Solver=”2BIK”/>
<IK EndEffector=”Bip01 L Foot” Handle=”LftLeg01″ Root=”Bip01 L Thigh” Solver=”2BIK”/>
<IK EndEffector=”Bip01 Neck” Handle=”Spine_SpineToNeck” Root=”Bip01 Spine” Solver=”CCDX” fStepSize=”10″ fThreshold=”10″ nMaxInteration=”15″/>
</LimbIK_Definition>

<FeetLock_Definition>
<RIKHandle Handle=”RgtLeg01″/>
<LIKHandle Handle=”LftLeg01″/>
</FeetLock_Definition>
</IK_Definition>


Pay attention to the names of EndEffector and Root here; they need to match your character’ skeleton joints exactly!


5) Create an Animation Graph:

To create an animation graph from scratch can be very a very daunting task. Which is why we’re going to use an already existing one… :) Thankfully, the good people at Crytek have forgotten an unused graph file which will work fine for our purpose. Open the Animation Graph and load the graph called “GirlTest.xml”.


It will complain that the character it refers to doesn’t exist, just click OK.

The first thing to do is to tell the graph to use our character. To do so, go to View->Preview Options.


This will bring up a panel to the right where you can substitute your character:


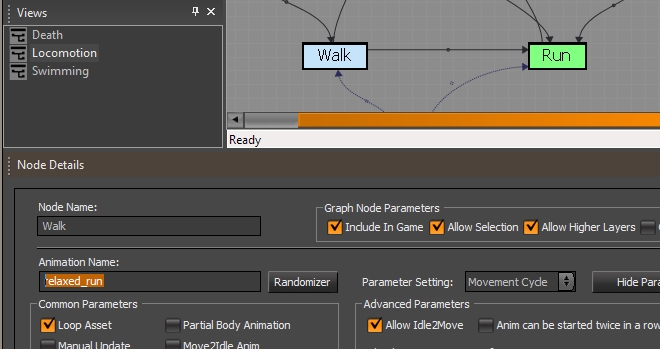
Next click on Locomotion (in the Views palette). This will show the locomotion diagram (we only care about Walk, Run and Idle). Then click on Walk (or Run) and input you locomotion graph name into the Animation Name field:


You’ll have to do the same thing for both the Walk and Run nodes. Do it also for the Idle node, although you’ll notice that for that one a random modifier is in effect. Click on the Randomizer button next to the animation name and replace all the animation fields in the popup window by your Idle animations. Or if you don’t care for the randomizer, just input the name of your Idle animation intead of “<RandomSet:…>”.

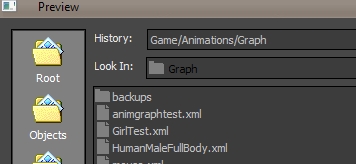
Don’t forget to save the animation graph as the name of your character (I called it “mouse.xml”) alongside the other graph files in …/Game/Animations/Graph.


6) Replace the player model:

To replace the player model, we’ll need to tweak the text file called “player.lua” located in …\Game\Scripts\Entities\actor. Replace the AnimationGraph and UpperBodyGraph with the anim graph you just created.

In the Properties section of the file, change the fileModel and clientFileModel to point to your .cdf file.

Note: You HAVE to use the .cdf file, NOT the .chr file!

This will make sure the third-person model and the shadow are those of your model. You may want to also change the first-person models, but this is beyond the scope of this tutorial.

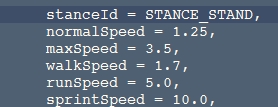
Incidentally you can also tweak the speed values to better match the speed of your animations:

You can also place the camera slightly to the side of the character, so we don’t just stand right behind it:

In this case, I have moved the camera 1 meter to the right of the character (in X).


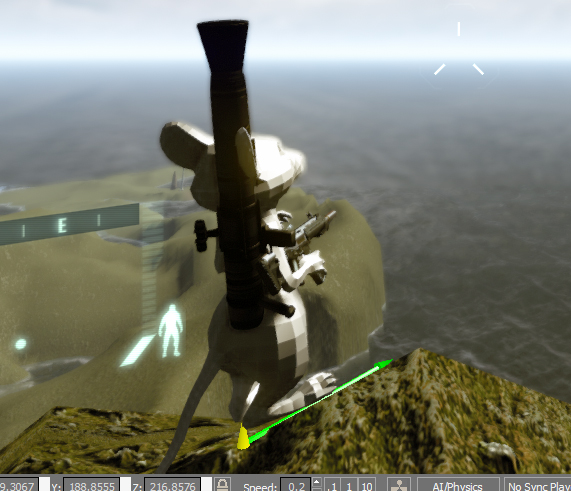
Finally, launch Sandbox (or close it first if it was open) and press CTRL+g to jump in-game. Then press F1 to switch to third-person view and take you character out for a walk… :)

You might want to use this console command:

ca_DrawLocator 1

It’ll draw a green line for the direction of your character and a yellow one for the speed.


And that’s it. Let me know if you have any question…


Categories: Tags:

MayaCE3 Tutorial 2: Exporting animation

February 27th, 2012 6 comments

Now that we’ve got our character into Sandbox, it’s time to export some animations. This tutorial assumes you followed precisely the previous tutorial.

In my current Maya scene I have:

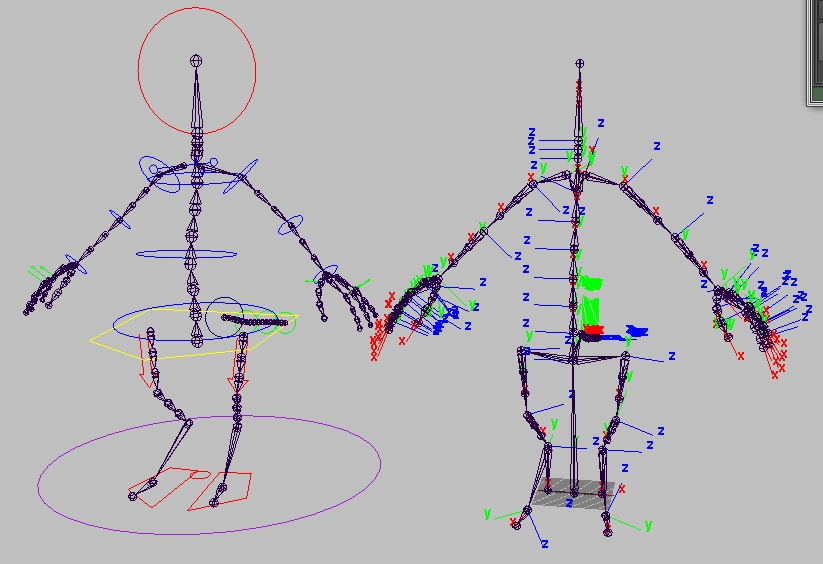
  • The master skeleton, which is the animation rig (on the left).
  • The slave skeleton, which is the actual deforming skeleton to which the geometry is bound (on the right).

The slave setup is a simple FK skeleton derived from my animation rig (the master skeleton). Its joints are driven by the master skeleton’s joints through the use of parent constraints. But if you intend to do the same, make sure that the Bip01 joint (the root-joint of the slave skeleton that sits on the ground in-between the legs) is only driven by a point-constraint.

Note: The Bip01 joint should only receive translation information, not rotation nor scale!


Be aware that when you export an animation, the character itself (mesh + skeleton) will NOT be exported; only the animation information on the joints (.caf file). So you must first export the character (as described in the previous tutorial) before you export animations for it.

Note: In order for an animation to work on a character (.chr file), the character must have at least the same number of joints (named the exact same way). But interestingly it can also have additional joints!

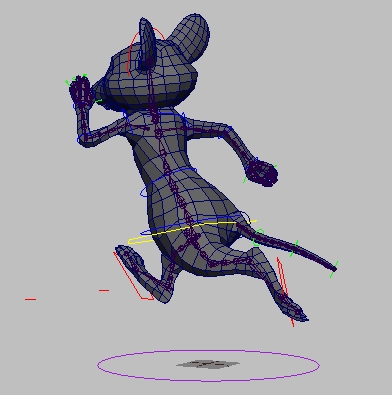
I will now proceed to export a run cycle for my character. But first, remember that if you animated your character on the spot for ease of animation, you need to actually have the character move through space. If you forget this, the CryEngine will complain that the “animation has no speed”!


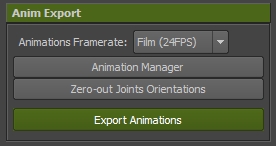
1) Define the frame rate:

The first thing to is define the frame rate at which you’re animating. In this case, since I key-framed my animation I used 24fps. MayaCE3 will convert everything to NTSC at export time, so you don’t have to worry about that.

Note: If you work at 24fps it is recommended to add a key before the first and after the last key of your animation in order to avoid a “pop” in the loop. This is due to an unavoidable artifact of the time unit conversion.


2) Create the animation clip:

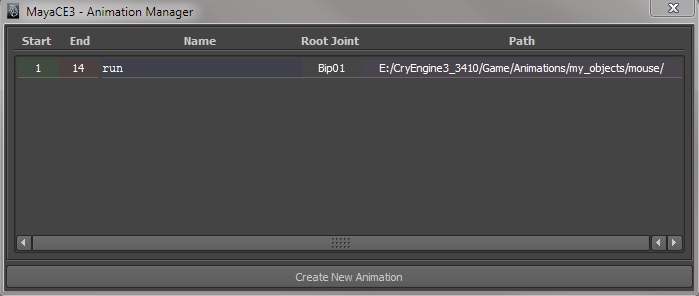
Click on “Animation Manager” and click on “Create New Animation“.

Input the information regarding the animation clip you want to create. Note that if you already have exported your character before and then clicked on Save Preferences then the Path field will be automatically filled up for you.

Note: At this point it is important to realize that the …/Game/Animations directory should be a mirror of your …/Game/Objects directory. So if I have a character exported in …/Game/Objects/my_objects/mouse then I should have a similar structure in …/Game/Animations/my_objects/mouse. If this is not the case, then the animation export will fail!

Also, you need to make sure that the official Crytek Animations.cba file lives in your …Game/Animations folder. This file gets automatically updated by MayaCE3 with your custom characters/animations info.


The information you entered will appear in the list of available animation clips.


3) Export the animations:

Click on “Export Animation“. If everything goes well, the compiler window will pop up and the .caf file will be created. MayaCE3 will also take care to automatically update the Animations.cba file and the .chrparams file.


4) Check you animations in Sandbox:

Load Sandbox (or close it down, then re-open it). Then open the Character Editor and load the character. On the left-hand side, in the Animations list, your animation should be available (in that case “run”).

Just click on the animation to see the result.

In the next tutorial, we’ll deal with replacing the player character with our own custom character…


Categories: Tags:

Frog moves to Sandbox 3

December 17th, 2011 No comments

So I’m slowly getting back in business nowadays. And I was curious to see what the lowrez frog model would look like under the sun of the CryEngine 3, so I quickly threw it through MayaCE3. After tweaking a bit the skin shader within the editor it came across fairly close from the Mudbox look.

Except in Mudbox I really went overboard with reflections and cubemaps, whereas in CE3 I went more for a more muted wet/glistening look…

Categories: CryEngine Tags: