Interactive GUI
DOWNLOAD:
This particular GUI implementation came about as I was fed-up of having to dig through hundreds of MEL code lines every time I needed to create a GUI for a new rig. It was a nightmare of widget columns and rows and long frustrating debugging sessions. And once I would get everything to work, just to add or change something was an annoying process at best. So it was time for a new way to create GUIs. One that would be visual, simple and interactive.
The beauty of it all is that creating a new button is as simple as duplicating an existing one and translating or scaling it the way you want. You could even reshape it completely (after all it’s just a polygonal plane) to make it look like the control it’s driving.
The concept behind it:
In a nutshell, when you click on a button, you want a certain control in your rig to be selected. You also want the selected buttons in your GUI to stay in sync with what’s really selected at all time. This is achieved by using the “trigger” scripts by the great Hamish McKenzie.
The only thing you need to do is rename the buttons to match their corresponding joints/controls. So if you want a button to select “L_elbow_JNT”, you would rename the button “L_elbow_GUI”. Then the script would look for a “L_elbow_” + “JNT” and hook it up to the “L_elbow_” + “GUI” button. By order of priority the script will try to find a matching “_JNT” object, then if it doesn’t find one, a “_CON” object (that can be changed in the script).
Installation:
First you should go to Hamish’s site, download and install the ZooToolBox. Then download the file on this page. In the .rar archive you’ll find the seithGUI.ma file which is a Maya scene, and the seithGUI.mel script which uses the Maya scene. Copy the MEL script to /My Documents/Maya/20xx/scripts folder and put the Maya GUI scene in your scenes folder.
Then source the mel script like so:
source “seithGUI.mel”;
And call the name of the command like so:
seithGUI(“myCharacter”, “X:/path/to/seithGUI.ma”);
Where the path should point to the Maya scene for the GUI. Eventually you should replace “myCharacter” by the name of the character the GUI is going to control, but you can leave it like that for the first time you try the GUI.
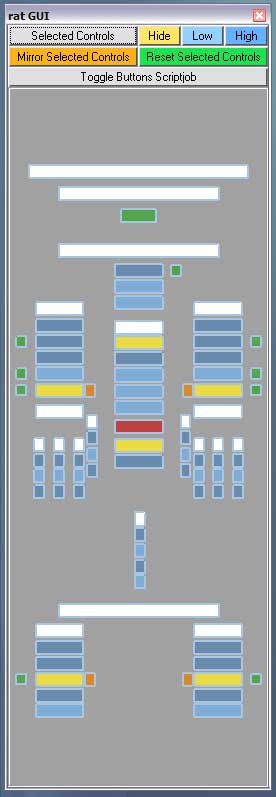
How to use it:
The method to hook-up a button to a control/joint is to first click on “Toggle Buttons ScriptJob”. It will “unhook” the buttons and you’ll be able to select a button’s actual geometry. Then just rename it, or duplicate it, reshape it, move it to your heart’s content. Do this with all the buttons (simply hide or delete the ones you don’t want to use). Finally you can assign a specific shader.
Important: The white buttons are “select all” buttons. And as such they should NOT get renamed and should keep their position in the overall hierarchy of the GUI. When the animator clicks on a “selectAll” button, every buttons that are located in its hierarchical group with be selected (e.g.: select a whole arm, etc…).
Once you’re done, click again on “Toggle Buttons ScriptJob” to hook-up the buttons to their respective joints/controls, and you’re done!
Notes:
When you’ve made a GUI for a character, you should save it somewhere as a Maya scene with only the GUI group. Make sure that the top GUI node is called “toto_GUI” and that the camera under it is called “totoGuiCam” (in the case of a character called “toto”).
Then you can make a button in a shelf sourcing the script and calling specifically the character’s GUI file. That way, if the GUI does not exist in your current scene it will be imported. If it does, it’ll just appear.
The little square buttons on the sides can be linked to procedures to call an IK/FK switch or a break-rotation behaviour. I didn’t include the procs, but I left the functionality in there so you can see how it can be used.