shotCam
DOWNLOAD:
shotCam (Maya rig scene)
shotCamLister (GUI)
Note: The shotCam.ma file is a Maya 2008 file. To make it compatible with earlier versions, open the file with Notepad and add “//” in front of line 5 (the one that says “requires maya “2008”).
Last updated on 18 May 2010: The GUI script is now compatible with Maya 2011.
INSTALLATION:
1) Put the shotCam.ma file and the shotCamLister_xxx.mel script in a directory on your disk drive.
2) Open the shotCamLister MEL script with Notepad (NOT Wordpad) and change the path on line 25 to reflect where you put the files in step 1:$importShotCam = "C:/my_scripts_path/shotCam.ma";
3) In the Maya script editor, type:
source "C:/my_scripts_path/shotCamLister_xxx.mel";(You need of course to use the path where you copied the files, and to replace the xxx by the correct file version)
shotCamLister;
INFO:
This is the camera rig I’m using for the ruff layout (RLO) stage of my short movie. The reason I’ve come up with this rig is that I’ve had to do pretty complex moves where you’d start on a very tight close-up on a face, and end-up on a huge wide-shot looking at a space shuttle falling towards the Earth. All in one scene of course.
 But first a few words about the way I work. This should answer any questions about the method behind the madness, and hopefully alleviate potential frustration stemming from the particularities of the rig.
Probably the most important notion is that you do not simply “rotate” the shotCam (with the rotate manipulator). That’s right. Any sideways, vertical or tumbling motions are happening through the specific channels. I know it might sound counter-intuitive at first, but after trying many options, it’s the one I chose. This way you can have very precise control on any part of your camera move at any point in your animation without impacting the overall move.
In other words, I never set the camera through the viewport itself (as you would normally move in the perspective view for example). I always manually “put” the camera where it should be in “real life” (using one of the transform groups included to that effect), and then only do I set up the composition for the shot itself.
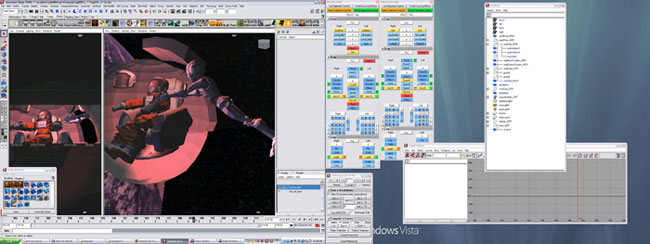
The way I work is I always keep on the side a viewport opened looking through the shotCam itself. A little bit like a monitor on a live-action shoot. That way, I can animate the camera like I would any other object with a weight and a trajectory. And I can keep an eye on the characters’ location to make sure they don’t end up in weird position and/or orientations.
So there are 2 steps here:
- I select one of the transform nodes (usually “transform_B”), and roughly place the camera (freely rotating and translating) where I think it should be.
- I refine the composition through the shotCam rig itself, using the channels to get what I want.
After that I won’t touch the transform node anymore and will only use the shotCam itself to do any camera move.
FEATURES: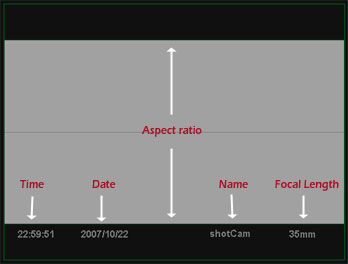
- Camera name; usually the sequence and scene number.
- Date of camera creation/modification.
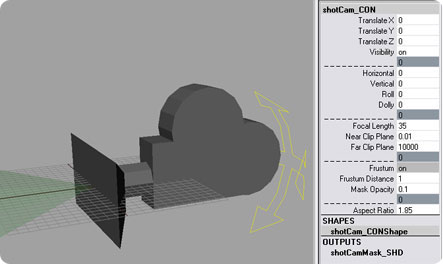
- A mask for blocking out what’s outside the shot (the famous “black bars”). The opacity is adjustable, from solid black to completely transparent.
- A visual display of the frustum, which is roughly the “cone of vision” of the camera. It shows you what’s inside the shot at any time.
- The focal length info gets updated in real time to reflect the animation.
- Separate attributes for horizontal pan, vertical pan, dolly, roll. The nice thing with those is that they will always act the way you expect; vertical is for up-down in any situation, horizontal for left-right and so on…
- Transform groups which let you constrain the shotCam while keeping all the channels open for animation. Useful if you use the camera in a “rigid referenced environment” (i.e.: a big studio).
- Multiple aspect ratio formats: TV (4:3), Widescreen (1.85) and Scope (2.35).
THE GUI:
 The GUI gives you quick access to your shotCam’s overall controls:
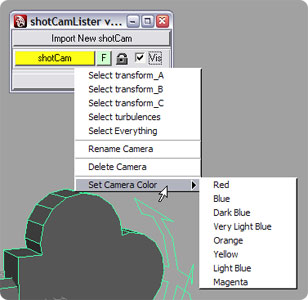
“Import New shotCam“: As the name says, it imports the shotCam rig (a Maya file) into your scene. You’ll be prompted to choose a name, a color, a focal length (default is at 35mm) and the aspect ratio (default 2:35).
The “F” stands for the camera’s frustum.
The padlock locks your camera’s attributes so they can’t be modified (to make sure you don’t change anything by mistake).
The “Vis” stands of course for “Visibility”. It’s useful because it’s different from the visibility of the shotCam itself. It commands the visibility of the shotCam top node; So you can turn it on or off without fear of messing your visibility keys.
Then you can right-click on the shotCam button to access a menu that lets you select individual nodes and edit the camera’s details.
NOTES:
- I made the nearClipPlane & farClipPlane attributes readily accessible because Maya has some weird display problem linked to the view distance. Sometimes, in order to remove the flickering on far-away objects, you have to play with the near clipping plane of the camera (don’t ask).
- Also, when you change the aspect ratio of the shotCam and you want to render an image, remember you need to manually update the resolution in your scene’s global render options window. I don’t want to make this automatic, since I have no way of knowing what specific resolution you want to use. It’s up to the user.
- I haven’t really tested shotCamLister (the GUI) with multiple shotCams present in the scene. It should work. If it doesn’t, gimme a shout.
- For now the turbulence node is just a group on which I run a parametrable randomShake.mel script that adds a cam shake. I could have used a noise node to drive it, but I didn’t find it indispensable. Who knows, maybe later I will…
TO DO:
- Add an “artist” field on the mask to display the shot’s artist’s name. Not really a priority for me so far…

This looks interesting. Im doing a shortfilm (still only in preproduction phase) and I am planning some hmm “complex” camera moves, so perhaps this camerarig of yours might come in handy =). Thanks!
Nice cam, very similar to the one i usually use but much better done. I also built a special one for arch vis fly throughs which smooths out different rotation pivot points (well if your going to do a floating cam you may as well do it well).
Cheers for the script/ cam / tutorial, much appreciated.
Note: You need to change the / to \ in the e.g “C:/my_scripts_path/shotCamLister_xxx.mel” also when i run the script i’m getting my viewports go blank or Maya crashing, also when i try importing a created camera scene. I get a fatal error when i try to open the shotCam.mb scene.
I’m using Maya 2008 x64 on, Win XP X64, 4GB ram, FX1500, quadcore workstsation (although it is a new machine and i’ve beeen having all sorts of problems importing older scenes, so it may just be a problem with me and not your script but thought you’d like to know anyway)
Dooh! was looking forward to checking this out. Thanx anyway.
very cool rig!
do you think you could add a control/locator thing for one of the control groups so its easy to select and setup the camera into the initial “pose”……?
unreal!!!!!!
Andy: You’re welcome, and I hope it does!
Chris: Thanks. You should be able to quickly select any transform group just by right-clicking on the shotCam button (in the GUI).
Or conversely, you could select on screen the “shotCam_CON” nurbs curve and press the up arrow on your keyboard.
(For now I don’t want to add any screen clutter… 😀 )
Awesome!
How about a frame counter field on the mask?
Thanks for making this available!
Oh my. This is a very old rig I made many years ago, and I haven’t used it with current versions of Maya (I don’t even know if it still works). If/when I need to revisit it I’ll publish a more modern version. Timestamp/frame counter is a good idea. I thought it was already part of the rig, but as I said this was several years ago and I’m not sure anymore…
Hi Seith,
I’m working with your shotcam rig and it’s very useful, I’m very grateful for that. But I have a problem.
When I’m trying to export shotcam’s camera movement with baking its animation (as Maya ASCII file), Maya giving me an error like this:
“Error: line 0: File contains unknown nodes or data. To preserve this information, the current file type cannot be changed.”
So, I cannot export the camera. How can I solve this? Thanks in advance.