Arm Rig Setup For Seamless FK/IK Switching
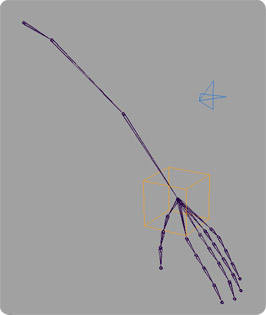
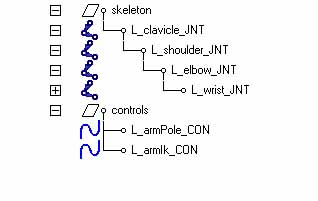
This tutorial assumes that you have the following simple skeleton:
- A joint named L_shoulder_JNT
- A joint named L_elbow_JNT
- An arm IK control object called L_armIk_CON (to which the IK handle is going to be point-constrained)
- A pole-vector control object called L_armPole_CON
You can download the Maya (6.0) scene here: armRig_001.ma.
The purpose of this tutorial is to detail the setup of a simple arm rig that will allow you to switch from FK to IK and vice-versa without the joints popping, which is very useful to pose a character (among other things). Please note that this method uses a single skeleton (no blending between multiple arms/skeletons).


In this example, the arm IK and pole vector control objects are Nurbs curves, but they could be any type of object you’d like. You can download the basic setup with this (maya 6.0) scene: armRig_001.ma.
Please note that it is indispensable that those joints form a perfectly flat plane. Bending the elbow is OK, but no twisting!
1) Building the Rig using MEL:
Now that we’ve got a basic skeleton and some controls, time to setup the arm rig itself. The following code is basically a scripted “tweaking” of the above Maya file to allow for the FK / IK switching:
// 1) First lock the Y and Z rotations on the elbow joint (it will only bend like a real elbow).

setAttr "L_elbow_JNT.jointTypeY" 0;

setAttr "L_elbow_JNT.jointTypeZ" 0;

setAttr -lock true -keyable false "L_elbow_JNT.ry";

setAttr -lock true -keyable false "L_elbow_JNT.rz";

//

// 2) Create the IK handle.

ikHandle -sol ikRPsolver -sj L_shoulder_JNT -ee L_wrist_JNT -n L_arm_IK;

//

// 3) Set the armIk control in world space (default values won't be 0, but we don't care).

move -rpr 0 0 0 L_armIk_CON;

makeIdentity -a 1 -r 1 -t 1 -s 1 L_armIk_CON;

vector $wristPos = `xform -query -a -worldSpace -rp L_wrist_JNT`;

move -worldSpace -a ($wristPos.x) ($wristPos.y) ($wristPos.z) L_armIk_CON;

makeIdentity -a 1 -r 1 -t 1 -s 1 L_armIk_CON;

pointConstraint -w 1 -o 0 0 0 L_armIk_CON L_arm_IK;

//

// 4) Create the default position locator for the arm pole vector

// (we'll use it to position the pole-vector when switching from FK to IK).

spaceLocator -p 0 0 0 -n "L_armPoleDefault_LOC";

vector $elbowPos = `xform -query -a -worldSpace -rp L_elbow_JNT`;

move -a ($elbowPos.x) ($elbowPos.y) ($elbowPos.z) L_armPoleDefault_LOC;

//

// 5) Parent the locator to the shoulder joint and put the locator behind the elbow.

parent L_armPoleDefault_LOC L_shoulder_JNT;

move -r -ws -wd 0 0 -10 "L_armPoleDefault_LOC";

setAttr "L_armPoleDefault_LOC.visibility" 0;

//

// 6) Match the position between the pole vector and the locator.

pointConstraint -w 1 -o 0 0 0 L_armPoleDefault_LOC L_armPole_CON;

delete L_armPole_CON_pointConstraint1;

makeIdentity -apply true -t 1 -r 1 -s 1 -n 0 "L_armPole_CON";

//

// 7) Pole-constraint the IK handle to the pole-vector control.

poleVectorConstraint -w 1 L_armPole_CON L_arm_IK;

//

// 8) Connect the IK handle visibility to the wrist IK enable attribute.

addAttr -ln enableIk -at bool -k on -dv 0 L_armIk_CON;

connectAttr -f L_armIk_CON.enableIk L_arm_IK.ikBlend;

connectAttr -f L_armIk_CON.enableIk L_arm_IK.visibility;

connectAttr -f L_armIk_CON.enableIk L_armIk_CON.visibility;

//

// 9) Put the arm in FK by default.

setAttr "L_armIk_CON.enableIk" 0;
2) IK/FK switching:
Now we have a rig ready for some switching. If everything went well, the Ik control object just disappeared (!). That’s normal, since the rig is currently in FK. So you can animate the elbow and shoulder joints by selecting and rotating them.
The whole idea behind this simple rig is to only use one skeleton for the arm, both in FK and IK. The trick is achieved by parenting a locator to L_shoulder_JNT that will serve as a ‘solid’ reference anchor point to which we snap the L_armPole_CON each time we switch to IK.
One advantage is that the locator will always be at the ‘right place’ for the plane of the arm to be respected (since it IS part of the arm skeleton); Therefore there won’t be ANY wobbling/popping at all when switching.
The other advantage for the animators is that they won’t have to look for the pole vector object every time they switch to IK, since it will ALWAYS appear at the same place/distance from the elbow.
When you want to switch to IK, use the following script: IkFk_switch_002.mel. You can source it, or copy and paste it into the script editor, and then make a button out of it. To run the script, just type:
IkFk_switch( "", "L_", "arm" );
The switch procedure itself is a command which takes 3 arguments; the first being the namespace (since the rig’s not referenced we’ll use “”), the second being the arm’s side (“L_” or “R_”) and finally the limb (“arm” or “leg”; in this case the arm). The code is abundantly commented, so please have a look to see what happens under the hood.
You should now see the Ik control object, neatly placed on the wrist. Now you can move it (as well as the pole vector object) and the arm should follow along.
To toggle back to FK, simply call the same procedure again (with the same arguments).
There you go!
As always, drop me a line if something explodes that shouldn’t…
thanks your tutorial
wow. So much work. Can you animate and rig? That’s a lot of knowledge there.
hello
first. thank you very much for the tutorial is very good ..
but there is something I do not work well ..
when switching to fk. (Arm maintains its position.).
but when will rotate the shoulder or elbow.
completely lost position ..
it is this?? ..
thank you very much ..
I would like you can help me in this part ..
I hope and lies been as clear as possible …
Hi there, I have a question that I would like to ask as I don’t seem to be able to find it online. For example, as I am rigging a simple human arm construction – Shoulder Joint, elbow Joint and wrist Joint.
Before I insert a iKhandle from the wrist to the shoulder, does the joints need to be align in the same level (while previewing it in the Front panel), suppose all the Joint axis are in the same/ correct direction?
Waiting to hear from you soon
Yes, it’s best to have the joints aligned in a plane. And to do a “Set Preferred Angle” on them as well, before you create the IK handle.
I came across this and so far, so good. I have added both arms with slight modding of the script. If it works the way I have in mind, it will be a godsend!
Sim, é melhor ter as articulações alinhadas em um avião. E para fazer um “Angle conjunto preferido” sobre eles, bem como, antes de criar a alça IK.
very very cool tutorial
but , no work NameSpace or Refrance ???
Please Help Me !
@Amin
Well, support for referenced characters would just mean adding the namespace (plus “:”) before each joint/control name in the script. It shouldn’t be too complicated, but that’s slightly beyond the purpose of that very old tutorial.
I should expect that rigging has come a long way since I posted this thing, and hopefully it isn’t really relevant anymore…
Thanks for the Tutorial, it is working fine for Left Arm.
Can you please help me out for similar setup for Right Arm.
Thanks
Well, it should just be a matter of creating a mirrored skeleton, renaming the joints and doing the same for the script (replacing all “L_” with “R_” to match the right arm). It should be pretty self-explanatory.
@Seith
Thanks for quick reply.
Got, the fix where I was wrong. I missed mirroring armIk_CON and armPole_CON in my version of Rig.
Thanks for your time.
Hi! thanks for the tutorial! Everything works well for me but I would like to ask, is it possible to set the “IkFk_switch( “”, “L_”, “arm” );” command to an object attribute?
so when that attribute changes, it runs the script?
Thanks!
Hi Kai. That’s a good question. I’m not sure actually. I usually proceed the other way around; I usually have a proc that’s called when the user does something, and that proc centralizes everything that needs to happen (in that case calling the switch). So there is no need to “link” behaviors like this.
@Seith
oh i see! i’ll try that way! thank you so much!