Exporting animated models from Maya to Crysis
This page gives instructions about the way to export animated models (.chr files) from Maya to Crysis. Before attempting to export an animated character, you should go to this page and try to export a simple static mesh. It’s a good reading anyway, since the basic concepts are similar.
Installation instructions for MayaCGF can be found on this page.

GENERAL CONCEPTS:
1) The direct method:
If you just want to export a simple animated model and you prefer to set keys directly on the skeleton that deforms the mesh, you can go ahead and do just that.
Note that you should still select the root joint of your skeleton and click on “Prepare Joints For Export” before attempting to export a .chr file. This should be done prior to skinning or animating the joints.
2) The master/slave method:
This method offers the advantage of allowing you to work with existing custom rigs. Basically, your custom animation rig (the master skeleton) drives the export skeleton (slave skeleton) through the use of parent-constraints. The export skeleton is still the one that actually deforms the geometry. The master animation rig itself is not exported, so you can go to town with it!
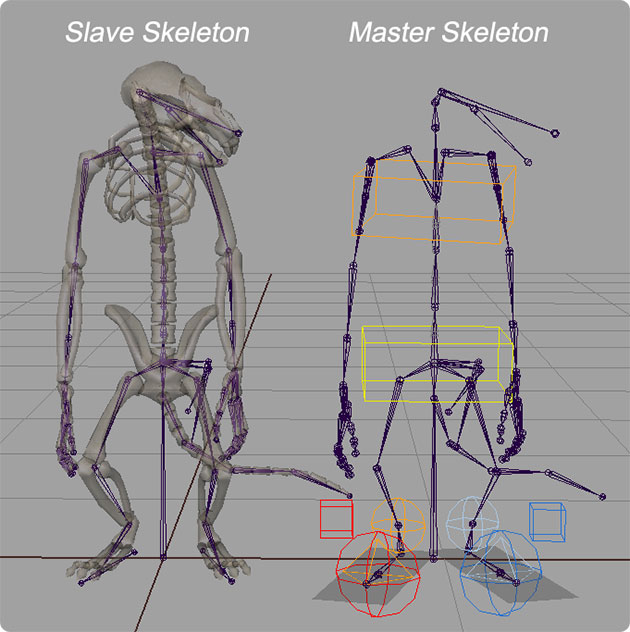
Again, the skeleton that deforms the geometry (on the left in the above picture) is a slave to the animation skeleton. The simple FK slave skeleton is the one that gets exported, along with the character mesh.
Here is a diagram showing an overview of the workflow:

THE EXPORT GROUP:
The name of the exported file is the name of the group in which your mesh and export skeleton reside. So if you name that group “my_model”, the resulting exported file will be called “my_model.chr”.
Note:The mesh (and skeleton) should face the -Z direction in order for the model to show up facing forward in Crysis.
The “exclude_GRP” is a group in which you can put things that you’d like to keep within the main character group for clarity sake but that should not get exported. Again, anything you put in the exclude group will be ignored.
Note: Any hidden object will NOT get exported. Even if they are NOT in the exclude group!
THE JOINTS:
The joints which are not an influence on the mesh (not part of the skincluster) will be automatically discarded by MayaCGF at export time. So if a joint is part of your hierarchy, make sure it is also part of the binding partition. Again, as a rule of thumb, each and every joints within the export skeleton should be an influence on the skinned mesh. You can set a joint’s weights to 0 if it’s just a helper joint, but it has to be part of the influences of the skincluster. So DO NOT use “Remove Unused Influence” when optimizing your scene!
In other words, if you have a wrist joint which is parented to a forearm joint, but the forearm joint is not part of the skincluster, then the wrist (and all the joints which stem from it, like hand and finfers) will NOT be taken into account by the CryEngine2, even if THEY are part of the skincluster! This will likely wreak havoc on your model.
IMPORTANT: The root joint of your skeleton should be part of the skinCluster, but its weights should be set to 0.
After you freeze the rotations on the export joints, the values from the jointOrient attributes have to be transferred onto the corresponding rotate channels. So by default the joints influencing the mesh should have values corresponding to their actual rotation and translation in their parent-space.
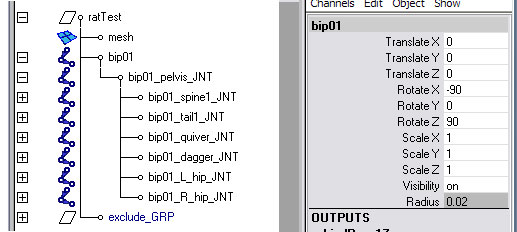
To achieve this tedious task with just one click, select the root node of the export skeleton (“bip01”) and click on “Prepare Binding Joints For Export” (in the Tools section of MayaCGF).
Then you can bind the mesh to the export skeleton (set “Max Influence” to 4).
Specific to the master/slave method:
The slave joints should bear the same name as the master joints, but be prefixed with “bip01_” (or whatever prefix you input in the text field). Then you just have to parent-constrain your slave joints to the joints in your animation rig (the master skeleton). After that, you shouldn’t interact directly with the slave skeleton. Use your animation rig, the slave joints will follow!
So the next step is to parent-constrain the slave skeleton to the master (animation) skeleton. To automatically do that, you can click on “Constrain Slave Skeleton”. All you have to do is select the slave skeleton’s root joint and run the script. It will look for the master joints based on the slave joints’ name minus the prefix mentioned earlier. So it you have a joint named “bip01_L_shoulder_JNT”, the script will constrain it to an existing “L_shoulder_JNT”.
Finally, you should bind the mesh to the slave skeleton (set “Max Influence” to 4).
So to sum-up: the animation rig/skeleton drives the slave skeleton (“bip01”), which in turn drives the mesh.
PHYSICS:
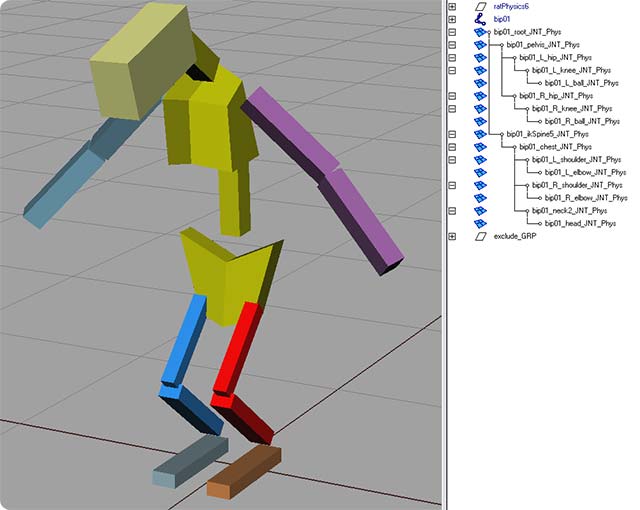
If you do not want to be able to walk right through your animated model then you should also build a physics skeleton for it. Create some very simple meshes that occupy roughly the same volume as your main joints and name them according to the joint they should represent plus “_Phys” at the end. For example, for a shoulder joint named “L_shoulder_JNT” you would build a mesh called “L_shoulder_JNT_Phys”.
Note: The physics meshes won’t follow the joints movements in Maya. This is normal. If they get in the way visually, just put them in a layer and hide them. DO NOT turn their visibility off or they will not get exported!
The physics hierarchy does NOT need to perfectly match the export skeleton joints one on one. In fact it is better if it doesn’t, as the skeleton for a classic biped can hold up to a hundred joints or more. The physics meshes should be few in number and fairly simple in topology (shperes, cubes, etc…). As long as the basic hierarchy makes sense and the name convention is respected, the physics will get exported correctly.
Finally, to make the physics meshes solid in Crysis, assign a cryShader to proxy meshes (please refer to the static models instructions page). And make sure to do a “Freeze Transforms” on all the “_Phys” meshes!
MATERIALS:
If your skinned mesh needs to have multiple materials assigned to it (say skin and fabric), then first work on separate meshes, each with its own Maya shader. Finally, combine all the meshes into one unique mesh and delete its history prior to binding it to the export skeleton. The correct materials will be respected and assigned to the proper faces within Sandbox 2.
BLENDSHAPES:
You must first bind your base mesh to the skeleton and then apply all the blend shapes at once. The reason for this is that there can be only one blendShape node related to the skin cluster. So if you decide later on to add a blend shape to an already existing blend shapes set, you must first delete the existing blendShape node (not the blend shapes meshes themselves!) and then reapply all the blend shapes at once to your skinned base mesh.
IMPORTANT: All of the blendShape meshes should reside in a group (e.g.: “blendShapes_GRP”) and should be hidden before you export. If you don’t hide the blendshapes (or at least their group), they will be exported as visible geometry and Sandbox2 will probably crash when you attempt to load the .chr file.
Also note that when you export a skinned mesh with blendshapes (most likely a character’s head), you can not have any physics proxy present in the scene. The physics proxy for your character’s head should be in the body’s .CHR file. The head will then be imported as an attachment within Sandbox2.
Note: You can move your blend shapes target meshes anywhere you want in space, but make sure NOT to freeze their Translate channels, or else when you fire the target within Sandbox2, your whole mesh will jump in space as well!
LODs (Level Of Detail objects):
To setup a LOD for your animated character, start by renaming the general export node by adding “_LOD1” at the end (eg: “myModel” would change to “myModel_LOD1”). You don’t need to change anything else in the hierarchy.
Then reduce the polygon number of the mesh by 50% and finally, save the Maya scene with a different name. After that, you can export the LOD as a .CHR file, the same way you did with the original character (level 0). To export the next LOD objects, (LOD2, LOD3, etc…) simply follow the same steps again.
When you put your .CHR file in your map (as an animated geometry entity, for example), you should pick the original .CHR file, NOT any of the LODs. The CryEngine2 automatically recognizes the other existing xxx_LODx.chr files and automatically swaps them depending on the distance to the camera. It’s not really intuitive, but that’s the way it works!
Note: You must remember that contrarily to .CGF files, where the LODs can reside within the same export group as the original, the LODs for .CHR files should be saved in different Maya scenes and considered almost as different characters. As such, you should export them separately, one by one.
Some rules about LODs:
- The maximum number of LODs allowed per exported file is 6 (usually 3 is amply sufficient).
- Each LOD should have a poly number reduced by at least 50 percents compared to the previous LOD.
- You can use fewer shaders on the LOD objects than on the original mesh.
- The last LOD object should be at least 300 polygons. If it’s less, it won’t be recognized by the CryEngine2.
IMPORTANT: Be aware that LODs for animated characters (.CHR files) will not work in the Character Editor, as opposed to LODs for static models (.CGF files), which do work as you move away from the model. So the only way to check the animated LODs in action is to put your .CHR file in a map.
SETTINGS/MODEL/RIG REQUIREMENTS:
– You should work at film speed (24fps). At export time, your animation will automatically be converted to NTSC (29.97fps), which the CryEngine2 uses.
– The space unit can be set to anything (mine is on “centimeters”), but remember that one unit in Maya is equivalent to one meter in Crysis.
– To successfully export a model, it should face the world negative Z axis. The positive world X axis should point to the right of the model (to your left if you look at your model from the front). Usually, rigs and models are created with the world +X on your right and +Z towards you. So you’ll probably have to rotate your animation rig 180 degrees in Y. You’ll have to do the same for the geometry. Then don’t forget to freeze the transforms on the geometry!
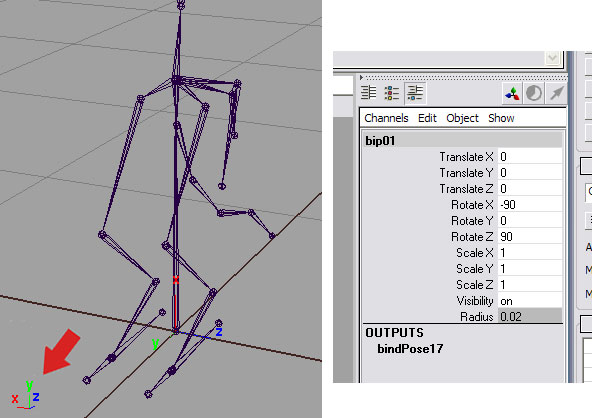
– The root joint of your export skeleton should lie at the origin of the world have rotateX set to -90, rotateY to 0 and rotateZ to 90 (the other joints can be oriented any way you want, but try to avoid values neighboring 180 degrees).
– Make sure that the joints influencing the mesh do not have default values close to 180 in either rotation channel; this would result in weird flipping artifacts on those joints.
– Always keep the default binding pose at frame 0 in your scene. It will be the reference frame upon which all your animations are based.
– Crysis only supports one skin cluster per character. Your multiple meshes should be combined into one single mesh and its history deleted before you bind it. However, if you combine your meshes after you skinned them, then don’t forget to do a Edit->Delete By Type->Non-Deformer History. Make sure “All non-deformer history” is the selected option.
– The number of joints influencing one vertex in the CryEngine2 is limited to 4. In consequence, when binding your mesh to the joints, set “Max Influences” to 4 or less.
– Each node (mesh, joint, etc…) in your model should have a unique name.
– You should only use parentConstraints to drive the slave skeleton (do not use point or orient constraints!).
– There should be no instanced nodes in the model.
– Scale attributes on the export joints and geometry should be set to 1. Scale animation is not supported by the CryEngine 2.
– The “rotateOrder” of your deform skeleton’s joints should be “xyz“.
– The “rotateAxis” and the “jointOrient” values of the slave skeleton’s joints should be 0 (and the “rotate” channels should inherit the “jointOrient” values).
– There should only be one blendShape node present in your scene.
– Vertex color does NOT work on .CHR files (not supported by the CryEngine2). More precisely, vertices with a color value below 0.5 will appear black, while those above 0.5 won’t have any visible effect.
TROUBLESHOOTING:
If you see joints twisting or popping out of place when you play your animation in Sandbox2, it probably means those joints have values in their “jointOrient” or “rotateAxis” attributes. Those should be set to 0; the only values should be in the “rotate” channels of the joints.
Also double-check that the rotate values in your slave skeleton’s joints are nowhere near 180 degrees.
If the default pose of your model looks wrong in Sandbox 2, turn on the joints label names (in the Debug Options of the Character Editor) and make sure all the joints have been exported (they most likely haven’t).
EXPORTING ANIMATION:
Again, you should always keep the default bind pose at frame 0 and set a key on all the joints. This is the reference frame upon which the animation export is based. If you don’t do this, your model will simply explode, both in Maya and Sandbox2.
Choose the directory to which you want to export your model. Note that you can also click on the quick path menu line to access bookmarks that give you instant access to the last ten locations you used.
To export animation, first click on “Add Animation Clip” to create… an animation clip! Give it a name and set the start and end frames for the animation. Finally, select your mesh group’s top node (in the first example above that would be “ratTest”) and click on “Export!”. When you export your animated model, several files will be created (depending on the type of file exported):
.dae: Those are temporary Collada files; text files of your model which get compiled by the Crytek compiler to produce the actual files used by the CryEngine2.
.chr: Binary file containing the data for the mesh and joints (vertices, normals, weighting, etc…)
.caf: Binary file containing the animation data corresponding to a .chr file.
.cal: Text file listing the .caf animation files and the name under which they should appear in the Sandbox2 editor.
.cdf: Text file containing data regarding the character’s attachments and the way it should appear if the player picks it up in his hands, as well as attachments.
.mtl: Text file containing the material (shader information) related to a model.
If the Crytek compiler cannot compile the model you exported, the log file will appear, and you’ll be able to see what caused a problem.
LOADING YOUR MODEL IN SANDBOX2:
To see your model in Sandbox2, simply call the Character Editor window (View->Open View Panel->Character Editor) and load the .chr file. You’ll see the list of available animations on the right-hand side column. The “null” animation is created by default and is just a one-frame place-holder. Your animations should be neatly located within a folder with your model’s name.
If you want certain animations to appear within yellow folders, just add a “_” sign in the name. For example, an animation clip named “blah_walk” will appear as “walk”, within a folder named “blah”.
In order to put your animation in a level, you’ll have to create a simple Geom Entity (I called mine “geomAnim”). Then you can make a flowgraph that starts the chosen animation as you jump in game, as shown in the picture below.
