MayaCE3 Tutorial 1: Exporting a character from Maya to the CryEngine3
This tutorial will show you the basic workflow to export a skinned geometry to Sandbox3. To install MayaCE3, follow the instructions on this page.
Here’s what’s needed in your scene to follow this tutorial:
- Geometry
- Skeleton
You’ll also need of course:
- MayaCE3
- The latest CryEngine 3 FreeSDK.
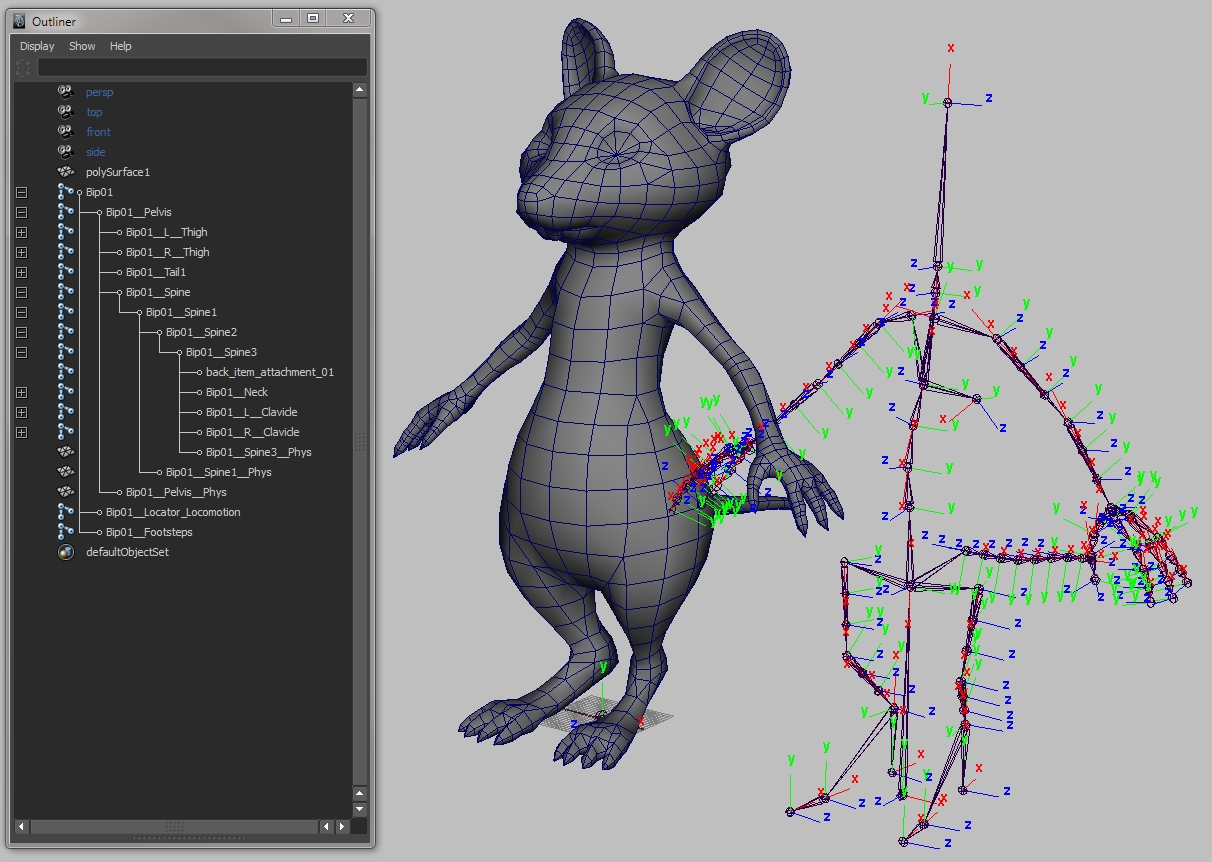
The geometry is a polygon mesh. The skeleton is a simple FK skeleton. Note that you can save your scene outside of the “…/Game/” directory, as long as the export path itself points to a directory within the “…/Game/…” hierarchy.
Don’t forget to assign a shader to your mesh: In this case I have created a Lambert called “mouse_SHD” and assigned it to the geometry.
Note: You must create a specific shader for your geometry. The default Lambert won’t work for our purpose, since you cannot rename it!
Rigging requirements:
Note: In the previous versions of the exporter the character used to have to face the -Z axis with the +X axis to its right. This is no longer the case in the latest version of the CryEngine 3 FreeSDK.
If you intend on your characters to benefit from the procedural LookIk that allows the character to automatically turn its head towards its target, then you should make sure you’ve got the following joints in your spine: Bip01__Pelvis, Bip01__Spine, Bip01__Spine1, Bip01__Spine2, Bip01__Spine3, Bip01__Neck, Bip01__Head and Bip01__Look.
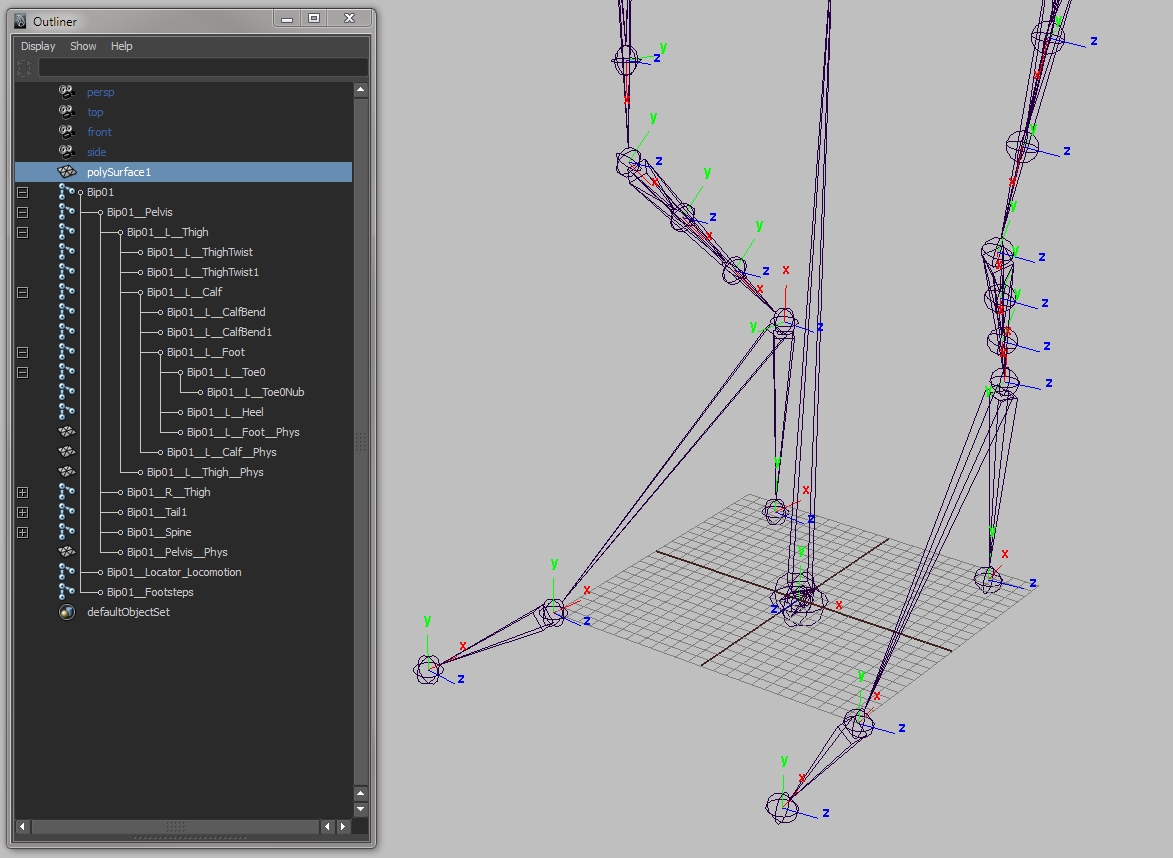
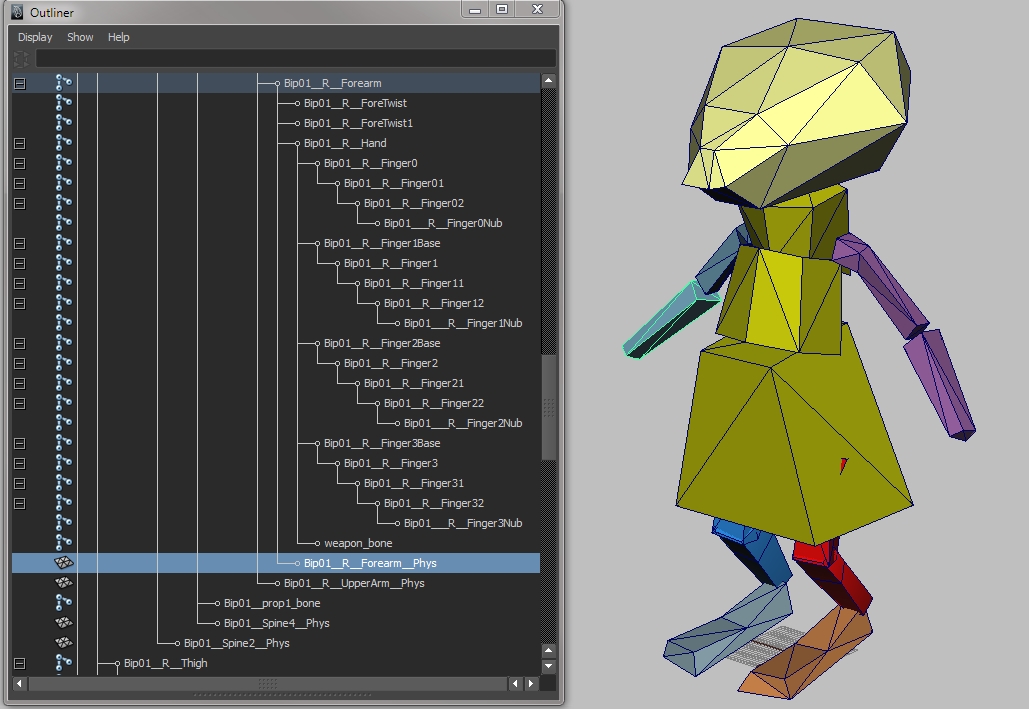
Pay particular attention to the way the foot and the leg are setup. In order to benefit from the automatic IK foot placement, make sure the foot joint is a direct child of the knee joint, and the knee joint is a direct child of the hip joint. You can use twist joints the way you like.
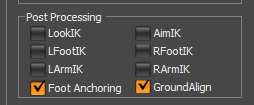
Note the orientation of the feet: this is important so the feet are automatically kept parallel to the ground surface by the CryEngine. You can check if your setup works by activating the “GroundAlign” checkbox in the Character Editor:
If the feet of your character instantly flip in a weird angle, then the foot’s -X axis probably doesn’t point straight down to the heel joint. You can test the IKs by checking the “LFootIK” box, then pressing the 4, 6, 8 and 2 keys on your keypad. CTRL+8 and CTRL+2 to move the IK up and down. Those key combinations are also used to rotate the ground plane.
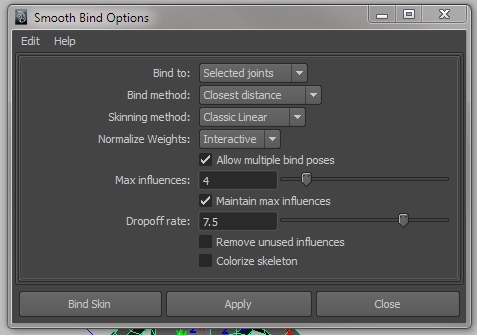
The skin is then bound to the skeleton using the following settings (in my experience, using Classic Linear works fine, but Crytek’s official documentation advises to use Quaternion instead):
If when you export you get an error message saying that a certain number of vertices have more than 4 influences (the limit for the CryEngine):
Then chances are you used the Mirror Weights function of Maya. Which works great, except it breaks the “Max Influences” setting for your skin (*glares at Autodesk*). In that case, just use this script: checkMaxSkinInfluences.mel (by David Hunt from Bungie) and call the main procedure with the name of the skin and the max number of influences, like so:
checkMaxSkinInfluences("mouse_MSH", 4);
This will select the offending vertices and you can then prune their weights with a very low value (0.001). And that should take care of the problem.
Note: The main root joint (located on the ground) should NOT be part of the skin cluster.
Physics:
The physics proxies are simple mesh shapes that get parented to the export skeleton.
There are 8 shaders that should be reserved for the physics proxy of your character. They should be placed first in the material group, followed by the other shaders used by your character.
Note: Don’t try to add shaders for the hands, as they’ll cause the compiler to complain about not being able to find some sub-materials.
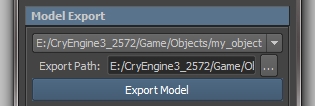
1) Define the export path:
That’s the directory where the character (the .chr file) will appear. In my case it is “E:\CryEngine3_2572\Game\Objects\my_objects\mouse”.
Note: This path MUST point to a directory located within in the …/Game/Objects/ directory.
At this point you can right-click on “Export Path” and choose “Add To Quick Paths” in order to store that path for reuse later on (even in a different scene).
Click on “Save Preferences“. This will create the CRYEXPORTSETTINGS node, which is a group used to store useful info on your scene setup. Never delete that node!
You also must make sure the Crytek compiler is correctly recognized. Click on “CryEngine Settings” and point to the base directory of the CryEngine (the folder where you copied the CryEngine 3 Free SDK).
The compiler will interpret your Maya model into a format that the CryEngine can understand.
2) Prepare the model:
Select the geometry and click on “Prepare For Export“.
This will create the appropriate hierarchy and material group for your model.
2) Create the .chrparams file:
Before you export the character, we’re going to create the .chrparams file, which contains info regarding the procedural LookIk I mentioned before, as well as a bunch of other things like IK limbs. You can use the following code as a basis for your own file:
<?xml version="1.0" ?><Params>

    <IK_Definition>
        <LimbIK_Definition>
            <IK EndEffector="Bip01 R Hand" Handle="RgtArm01" Root="Bip01 R UpperArm" Solver="2BIK"/>
            <IK EndEffector="Bip01 L Hand" Handle="LftArm01" Root="Bip01 L UpperArm" Solver="2BIK"/>
            <IK EndEffector="Bip01 R Foot" Handle="RgtLeg01" Root="Bip01 R Thigh" Solver="2BIK"/>
            <IK EndEffector="Bip01 L Foot" Handle="LftLeg01" Root="Bip01 L Thigh" Solver="2BIK"/>
            <IK EndEffector="Bip01 Neck" Handle="Spine_SpineToNeck" Root="Bip01 Spine" Solver="CCDX" fStepSize="10" fThreshold="10" nMaxInteration="15"/>
        </LimbIK_Definition>


        <IKTarget_CharacterSetup>
            <!-- This section contains optional additional data for this character when he is using the IKTarget System or the Procedural Object Interaction System -->
            <!-- every tag is optional, the default setup override the internals defaults and will be used for all limbs not specifically listed below -->
            <!-- armLength: value used for distance calculation - does not need to represent actual arm value - can be made shorter for effects -->
            <!-- endEffPullback: hand/finger thickness, the hand will be moved back by this automatically to avoid clipping (to adjust for the mesh around the bone) -->
            <!-- animLayer: use this layer for limb animations (hand or finger poses for example) for this limb -->

            <DefaultSetup armLength="0.51" xEffPullback="-0.9" yEffPullback="-0.03"/>
            <LimbSetup IKHandle="RgtArm01" animLayer="8" armLength="0.5" xEffPullback="-0.1" yEffPullback="-0.035"/>
            <LimbSetup IKHandle="LftArm01" animLayer="9" armLength="0.5" xEffPullback="-0.1" yEffPullback="-0.035"/>

            <!-- If a spine handle is specified, the Procedural Object Interaction System will use it. -->
            <!-- As with the arm length, the length for a straight spine can be manually set and can be shorter than the actual spine
                 to create an even stronger curvature when bending forward to increase the character's reach -->
            <SpineSetup IKHandle="Spine_SpineToNeck" spineLength="0.40"/>
        </IKTarget_CharacterSetup>


        <LookIK_Definition>
                <LEyeAttachment Name="eye_left"/>
                <REyeAttachment Name="eye_right"/>

                <DirectionalBlends>
                    <Joint AnimToken="LookPoses" ParameterJoint="Bip01 Look" ReferenceJoint="Bip01 Pelvis" StartJoint="Bip01 Look"/>
                </DirectionalBlends>

            <DefaultLookPose name="LookPoses_sdk_Head"/>

                <RotationList>
                    <Rotation Additive="1" JointName="Bip01 Pelvis" Primary="1"/>
                    <Rotation Additive="1" JointName="Bip01 Spine" Primary="1"/>
                    <Rotation Additive="1" JointName="Bip01 Spine1" Primary="1"/>
                    <Rotation Additive="1" JointName="Bip01 Spine2" Primary="1"/>
                    <Rotation Additive="1" JointName="Bip01 Spine3" Primary="1"/>
                    <Rotation Additive="1" JointName="Bip01 Neck" Primary="1"/>
                    <Rotation Additive="1" JointName="Bip01 Head" Primary="1"/>
                    <Rotation Additive="1" JointName="Bip01 Look" Primary="1"/>
                </RotationList>

                <PositionList>
                    <Position Additive="1" JointName="Bip01 Pelvis"/>
                </PositionList>
         </LookIK_Definition>


        <FeetLock_Definition>
            <RIKHandle Handle="RgtLeg01"/>
            <LIKHandle Handle="LftLeg01"/>
        </FeetLock_Definition>


        <AimIK_Definition>
            <DirectionalBlends>
                <Joint AnimToken="AimPoses" ParameterJoint="weapon_bone" ReferenceJoint="Bip01" StartJoint="Bip01 R UpperArm"/>
            </DirectionalBlends>

            <RotationList>
              <Rotation Additive="0" JointName="Bip01 Spine" Primary="1"/>
              <Rotation Additive="0" JointName="Bip01 Spine1" Primary="1"/>
              <Rotation Additive="0" JointName="Bip01 Spine2" Primary="1"/>
              <Rotation Additive="0" JointName="Bip01 Spine3" Primary="1"/>
              <Rotation Additive="0" JointName="Bip01 Neck" Primary="1"/>
              <Rotation Additive="0" JointName="Bip01 Head" Primary="0"/>

              <Rotation Additive="0" JointName="Bip01 R Clavicle" Primary="1"/>
              <Rotation Additive="0" JointName="Bip01 R UpperArm" Primary="1"/>
              <Rotation Additive="0" JointName="Bip01 R ForeArm" Primary="1"/>
              <Rotation Additive="0" JointName="Bip01 R Hand" Primary="1"/>
              <Rotation Additive="0" JointName="weapon_bone" Primary="1"/>

              <Rotation Additive="0" JointName="Bip01 L Clavicle" Primary="0"/>
              <Rotation Additive="0" JointName="Bip01 L UpperArm" Primary="0"/>
              <Rotation Additive="0" JointName="Bip01 L ForeArm" Primary="0"/>
              <Rotation Additive="0" JointName="Bip01 L Hand" Primary="0"/>
            </RotationList>


            <PositionList>
              <Position JointName="Bip01 R Clavicle"/>
              <Position JointName="weapon_bone"/>
              <Position JointName="Bip01 L Clavicle"/>
            </PositionList>

            <ProcAdjustments>
                <Spine JointName="Bip01 Pelvis"/>
                <Spine JointName="Bip01 Spine"/>
                <Spine JointName="Bip01 Spine1"/>
                <Spine JointName="Bip01 Spine2"/>
                <Spine JointName="Bip01 Spine3"/>
            </ProcAdjustments>
        </AimIK_Definition>

    </IK_Definition>


    <AnimationList>
        <Animation name="#filepath" path="Animations/my_objects/mouse/"/>
    </AnimationList>

</Params>
Note that the <AnimationList> element is empty, besides the path to the future animations. That’s alright, as MayaCE3 will fill up the animation list as we export them (in the next tutorial).
Save this file to the same directory you’ve chosen to export your character to (cf. Step 1), with the name [your character name].chrparams (in this case “mouse.charparams”).
3) Export the character:
Select the CryExport node and click on “Export Selected Objects“.
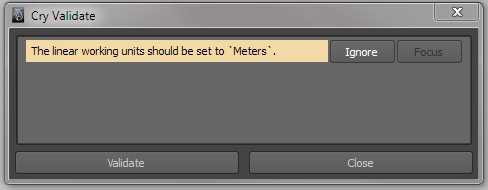
You might see this window come up:
In fact you may get warnings about the “working unit” which should be “Meters” instead of “Centimeters”, or the FPS needing to be NTSC (29.97) instead of “Movie” (24 fps). But you can actually safely ignore those. Just click on “Ignore” in front of each warning, but don’t close the window itself! If you do, it will just pop up again and you won’t be able to export anything.
Note: If the line’s background color is red instead of yellow, then it means you won’t be able to ignore the problem and instead will HAVE to fix it.
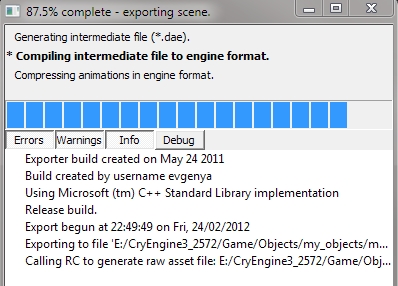
Just click on “Export Model” again (with the Cry Validate window still up) and the model will be exported. The compiler window will briefly pop up and vanish once the export is done.
If it doesn’t disappear on its own, then it means there’s something wrong with the model. In that case, try to make sense out of the error messages! 
After the export you’ll find those files in the export directory:
The important files are the first two ones. The others are log and intermediary files (don’t worry about those).
4) Load the character in Sandbox:
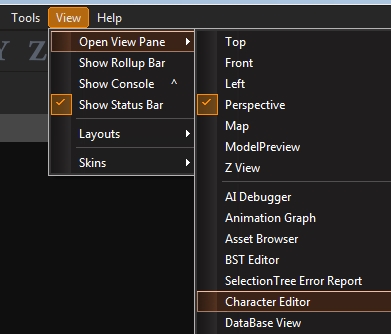
Open Sandbox, then open the Character Editor (from the View->Open View Pane sub-menu).
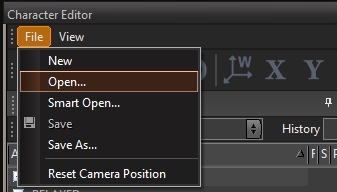
Then load your character by clicking on “File->Open“.
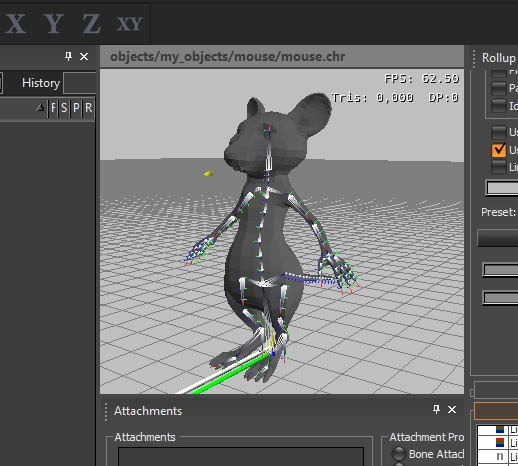
Go to the export directory and choose the .chr file you just exported from Maya. If there’s no problem the file will load and appear in the preview window.
Here I went to the Debug Options part (in the lower right corner of the Character Editor) and checked the “Show Skeleton” check box to make sure everything exported fine.
At this point you can also check if the LookIK works by checking the corresponding check box. The character should now follow you with its head when you move around with the camera.
Hope it helps! The next tutorial will deal with exporting animations…





Hello Seith
many thank to you and all the support and the interest you have with maya and the cryengine .
I got some questions about the rigging of your character.
do you only using “joints” in your rig, to produce the animations of your player ?
what about ik chains, and is it possible to create a complex rig and export it to cryengine ?
what ik spline handle tool ? are you using this for the spine/neck/tail of your character ?
From my personal experience ( very short one) in animation stuff with maya, i know that when you are using a complex rig ( IK/FK chains, management of the center of gravity of the character, etc..)
the problem with a too complex rig, is about the exporters
If the joints/bones are duplicated for the ik/fk chains, the exporter must exclude the type of component before the export of the model for the game engine you are working with.
only the binded joint must be exported to the game engine.
so with a these problems, i thought about the re-targeting features.
i have my model rigged with a complex rig ( COF, IK, and FK chains)
i duplicate the models and the binded bone, and i want to re-target the animation from the complex rig to the model with only the geometry and the binded bones.
Do you think this could work or not ? i work with cryengine and source engine.
the problem is the same on the two engines. but the re-targeting could resolve all the problem with all type of exporters for any game engine.
well i get this problem and all this questions because, i starting to work with maya now, i was on lightwave in the past, but it’s too limited for cryengine ( source engine too lol ).
i have try to rig a quadruped model with the auto rigger called Quadruped rigger, but as you could know that, the model can’t be exported into cryengine because of the rigging structure limitation.
i haven’t try that with human IK, because my model is a quadruped, but i had to test out this too.
May that the characterization will duplicate the spine bones too ( ik anf fk) and create some nodes who will be considered as joints bones into my final files i would like to export in any of the game engine i working with.
well if you could help me on that, i will be able lately to write a tutorial on how use humanIK and quadruped rigger, and re-target the rig animations to a more simple model with a exportable joint bones structure readable by any game engine.
You should have a look at this page: http://seithcg.com/wordpress/?page_id=316 It contains erroneous and outdated information in regards to the CryEngine 3 (it was made for CryEngine 1), but it may answer a few questions you have. The general gist of it is still relevant.
In short, as you guessed, you can have the most complex rig ever devised as your master (animation) rig, and just have a simple FK skeleton (to which you bind the geometry) being driven by it (through parent-constraints).
hi again !
thank you so much, you and your tutorials
you really help me a lot on many basic things, such as creating empty groups hehe
friendly
Fuzz
Hi Seith, I’m a novice of Maya and Cryengine3. I followed your steps listed above to export a rigged horse model from Maya to Cryengine3,
but when I clicked on Material Groups Editor I found something wrong like that in Maya 2012:
Error: Cannot find procedure”cryMaterialWin”.
Also Cry Validate says:
Mesh”horse_MSHShape” has a material(blinn 1) that is not in a group.
No material groups found in scene.
Could you help me out of these problems? Much gratitude.
Hey Seth,
Is there a simple static mesh export tutorial, without the animation part? I’ve tried to go step by step with this for my barrel, but it doesn’t work.
Poca
I mean, where is the proxy in all this? Please respond.
The official doc talks about setting up a pysics proxy: http://freesdk.crydev.net/display/SDKDOC3/Physics+Proxy
The lazy way to do it would be to bypass its creation and simply choose “Default” from the extra attribute of the shader assigned to the object’s geometry. That would make it solid.
Thanks for the response. I’ve had better luck, today. Only, I’m getting failed to export game/objects/afghanigas.cgf (my mesh is afghanigas) What are some reasons that may be why the .cgf didn’t make it. I checked for degraded faces = okay. and the model was validated. Is there anything that stands out?
Thanks again.
Sure there could be any sort of problems! But unless you can send me the original Maya file there’s no way for me to tell though…
Alex, from the error messages you mention two things seem clear: the first one is MayaCE3 is not correctly installed on your machine (the cryMaterialWin proc is part of the scripts installed with MayaCE3). The second is that the material errors you get stem from the first issue; MayaCE3 is not properly installed, hence not recognized by Maya. Being a novice at Maya, please try and read the official documentation bit concerning the concepts behind MEL and Python files, as well as sourcing. Then you should probably start by trying to export a simple cylinder-and-joints setup. Small moves…
Seith, thanks for your answers and advice.you’re friendly and skilled. I’ll keep that in mind and have your advice done.
Seith,
all the props i have exported all said they failed to export the #.cgf file, but when I looked in the folders, they had. Also, when I load them into the cry engine, their pivots are offset by quiet alot. I had centered them/froze transformations, del history in maya. Could u tell me what caused this.
the other question, is there some kind of lock button that i am missing with textures. I apply them, then save the scene. when i reopen the cry scene, the meshes are there, but there are no textures applied, only the the RED REPLACE ME. Thanks for your help
Hi Seith, I’m trying to do interactive animation for children ,could you give me some suggestions on how to get start? Is it possible to use the CryEngine3 to implement the interactive technique ,for example I want to use hand gesture to control the character? what about Maya? Waiting for your response. Thank you!
Mmh… This question might be slightly beyond the scope of this topic. I actually have no experience with the kind of projects you’re talking about (although it sounds interesting). It all depends if you have motion-capture facilities available. My advise would be to post the question on the Crydev official forums. Crytek employees may be able to help you with that.
Hi ,Seith ,thanks for your advice. Now I’m doing my homework by Unity3D as I can’t detect any informations ahout doing HCI in Cryengine3 from the documentations. Surprisingly, Unity3d meet my requirement well with the support of OpenNI framework and Kinect, in addition Unity3d directly supports Maya that import your assets from Maya to Unity3d is simple. Again, thanks for your attentions.
Hi. I just got a small question. I’ve notice that on the pictures, pivot points, pointing different directions. Would you like to help me establish which direction is right?
The second picture is the correct one in terms of pivots. The first picture shows the slave skeleton before it was constrained to the master skeleton.
Hey Seith, thank you for the great tutorial. I did get it working partially but am still having problems with the checkMaxSkinInfluences error. It seems to occur whenever I have more than 4 bones. I put the file you suggested in ‘Documents\maya\2012-x64\scripts’ and called the method and it just hangs. I believe it is being called correctly because if I give it the wrong mesh name it will complain about the name being wrong. Does my set up of the mel file sound correct? I am new to maya. Thank you!
Sorry, delete my comment….I walked away for 5 minutes and it worked! I guess I should of been more patient with it. Maybe you could add that running that script could take a while. 😛
Hey Seith, I am having issues with the skinning influences. I run the command and it selects the vertices then I go to Skin>Edit Smooth Skin>Prune Small Weights to .001. This fixes about 95% of them but there are still some that remain. Any ideas on how to get rid of those remaining ones? Anyone else encounter this?
Yes, that can happen. In this case, just up the value by a x10 increment (so instead of .001, try 0.01).
@Seith
Thank you Seith that got me very, very close! I now only have 2 vertices with errors. I tried pruning all the way up to 1.0 but they still remain. When I prune them I get the following warning:
“// Warning: Prune was skipped for some or all components. All weights would have been pruned.”
Any ideas? Maybe there is some other way around this.
Mmh… That’s not normal at all; Sometimes you might have to prune up to 0.1 or even 0.25, but anything over that is clearly indicative of a fishy mesh (and a value of 1.0 cannot work, as it would be the equivalent of “un-binding” the vertices).
So when you run the checkMaxSkinInfluences script you end up with 2 selected vertices, then with those 2 vertices still selected you run the prune command and it doesn’t work? I have actually never met this situation. You should give your mesh a good clean-up. And also you should make sure you didn’t inadvertently bind the mesh with 5 or more influences while the “Maintain Number of Influences” checkbox is checked. That would cause Maya to stubbornly try and maintain more than 4 influences.
I finally got things working. I started with a simpler model to see where it went wrong. I am pretty sure that what cause the problems earlier was that I didn’t bind the skin properly. Once I did that I got a new error caused by having more than one root bone node. But all is good now. Thanks again for your help Seith!
thank you, I put the time, I read all your other tutorial but ultimately it works, Your way works!
Merci Seith!
Great tutorial, I am almost there! Have you ever gotten a Max Influence of 1 error? I got the error with 4 and was able to prune those away but I am still getting a “Max is 1” error. Any ideas? Thanks!
Max influence of 1? Nope. I’m not even sure what you mean by that. Is that an error you get at export time? Did you bind your skin with a max influence of 4? You might want to delete the history on the skin and give it another try…
I apologize the actual message is this:
“Mesh X has X vertices with skinning weights that don’t add up to1.”
I found the solution, thanks Seith!
http://www.crydev.net/viewtopic.php?f=355&t=81921
Hello Seith
I imported the standart 3ds max biped in maya and used it for my charakter.
But when I tried to export it I got the following error:
Skeleton root `Bip01` has a non-zero rotation.
I have alredy tried to use the Freez Transformation tool but it didn’t work.
Do you have any idea what to do?
Freeze Transformation will not work on a skinned mesh, that’s for sure. But did you try using the “Zero-out Joints Orientations” in MayaCE3’s Anim Export frame?
No I didn’t try these.
Can you tell me how to do it.
(I’m not very god in maya)
You simply select the Bip01 joint (the very root of your character) and click on the button “Zero-out Joints Translations” of the “Anim Export” frame (the green one) in MayaCE3’s interface.
Thanks for the explanation.
I tried it this way but the error occured again:(
I also looked in the Atribute Editor and saw that the rotation of Bip01 is already 0
on the X,Y and Z axe.
Do you have any other Idea?
Nope, not really sorry. But the CryEngine is very fussy about values in the rotateAxis and jointOrient attributes. Just have a look at the “Agent” rig provided by Crytek and try to see what the fundamental differences with your joints are…
@Seith
Could you be more specific? I’m having the same problem, but I have no idea how I could have it installed incorrectly. All I did was run your installer and click the checkbox for “Maya 2011,” which is the version I’m using. Those are the only steps in the installer, and the rest of the plugin’s tools are working fine, just not the material group editor. I had been trying the original MayaCryExporter prior to installing this, though. Could that have something to do with it?
Yes, probably. If you modified the maya.env file to include the path to the official exporter, you should simply rename the file to something else, or delete it, or remove the change you made. After that, restart Maya and it won’t be “aware” anymore of the original exporter. Hence no more conflict.
@alex
did you find a solution for this?
Hi Seith I have an issue thats driving me nuts. Basically whenever I export selected objects I get a message in cry validate saying mesh ‘……’ has x number of vertices without uv’s even though i have applied a shader as advised at the begining of the tutorial. Any advice on fixing the issue? this is the only thing stopping me from exporting my object now.
Hi Robin. Have you tried simply nuking the current UV set and redoing the UVs from scratch (starting from a standard projection)? The CryEngine is very picky about UVs…
Hi seith I tried that too i think i’ll start with a cube and see how it goes from there.
Hi Seith, I ran into an issue with joint orientations that I hope you can help out with.
I was setting up Look IK for my character and I notice that my character is looking in the opposite direction of where I am aiming (up/down). I checked the character’s skeleton and it appears that the x-axes are pointing down the spine chain (http://i.imgur.com/TBaD2.jpg). I went back to my Maya scene to check the skeleton there and all of the x-axes seem to be pointing up the spine. Do the orientations get flipped somewhere along the export process? I also noticed in your skeleton example of the mouse rig that you have your x-axes pointing down.
I’m still pretty new to rigging so any help would be much appreciated. I also wanted to say thanks for the great guide. It definitely helped me with getting custom characters and animations in-game.
Hi Terry. Yes, I remember the joints’ orientation gets flipped during the export process. You’ll need to tweak the Local Rotation Axii of your rig’s joints so that they look correct in Sandbox. It’s a requirement for lookIK and also feetIK if I recall correctly.
@Seith
Cool, that did the trick. Turns out I was adjusting the joint orientation to compensate rather than the local rotation axis. Thanks again!
Just wanted to say you are an amazing artist and have made an amazing tool..great leveldesign as well.
Hello everyone. Do i require photoshop to export materials from maya to cryengine 3 or will mayace3 alone be enough to do the job?
please answer this one
MayaCE3 is a 3D tool and its purpose is to export Maya models into files that can be loaded inside the Sandbox editor. The models’ textures can be created in Photoshop or any other 2D painting program. In other words MayaCE3 has nothing to do with Photoshop. I hope that clears up any confusion.
Hello Seith
I would like to create custom character different from CryEngine’s rig system. It will be just a simple battleship. Assume that there is no moving parts, only rigid body. Animations will only be rotate right, left etc. So in this case there will be only one bone in the model. But the charparams is cry default and need to be modified. Can you help?
Hi Serhat. I haven’t used the cryEngine for almost a year now and all its particularities have fled my little brain. I believe it is possible to achieve what you’re looking for though. It might require the creation of “Bip01” and “Bip01_Pelvis” joints but I can’t be quite sure. And I really can’t remember what the chrparams should be in such a case. Good luck!
Thanks Seith anyway. Actually after I asked this question an interesting idea came up my mind. Because it is little bit complicated to write charparams in such situation, I believe I can use whole standard rig skeleton. Only pelvis rig affects whole model body %100. Arms legs and other stuff stays useless. When we rotate the standart rig, model will rotate also and no charparam needs to change. And if cry engine requires head model seperately as an obligation, I can draw a head (simple box for example) and hide it in the engine
Does this work? What do you think?