Search Results

Keyword: ‘cryengine’

Exporting static models from Maya to Crysis.

October 31st, 2009 No comments

This page gives instructions about the way to export static models (.cgf files) from Maya to Crysis. For animated characters, please refer to this page.

Installation instructions for MayaCGF can be found on this page.

The Geometry:

When working in Maya, you should make sure to turn off two-sided lighting in the viewport (Lighting->Two Sided Lighting). That way, if some faces turn black, you’ll know the normals are flipped the wrong way.

The model can be constituted of any number of separated meshes. You do not have to combine them. All the meshes making up your model should be located in a group. That group’s name is going to be the name of your exported model.

You don’t have to delete the history when exporting a static model, although sometimes there’s no way around it (see Troubleshooting section). But always make sure you freeze the transformations (especially Scale)! Also, there should be no instanced nodes anywhere in the model. And each name should be unique.

Physics Proxy:

Before you export your model, you should make it solid by creating a collision mesh, also called a “physics proxy”. This is not strictly necessary in the sense that if you simply assign a “Physics” shader (in MayaCGF’s Tools section) the Cryengine2 will automatically physicalyze the model (even if it doesn’t find a physics proxy mesh). But it is better to create a simple mesh that roughly encompasses your render mesh. The Cryengine2 could get confused if the physics mesh is too complex, and it will contribute to slow things down anyway.

IMPORTANT: Do not turn the visibility of the physics meshes (or their parents) off. If you do the physics will not get exported! If you want to hide the physics meshes, just put them in a layer and turn the layer’s visibility off.

Also, be aware that Sandbox2 does not reflect the changes you make on a physics mesh when you re-export models during the same session. So you may have to close and restart Sandbox2 to update the collision proxy.

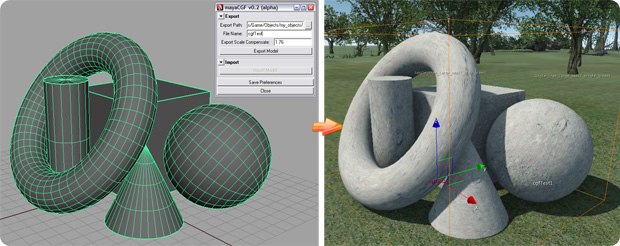
For a mesh called “myMesh”, you should name the proxy mesh “myMesh_Phys” and make sure it is parented to the top node along with the mesh itself. In the picture above you can see the render mesh selected (a beveled cube), and around it (in Xray mode) the physics proxy.

LODs (Level Of Detail objects):

This paragraph deals with static model LODs. Animated model LODs follow a different method. To include a LOD in your model, just make a copy of your mesh, then rename it to “_lod1” and parent it to the original mesh itself (not the general export group). Finally, reduce the polygon number by 50% and delete the history. Some rules about LODs:

  • You can add a suffix after the “_lod1” part (eg: “_lod1_mySphere”) but the name must start with “_lod1” (or “_lod2”, “_lod3”, etc…).
  • The maximum number of LODs allowed per exported file is 6 (usually 3 is amply sufficient).
  • Each LOD should have a poly number reduced by at least 50 percents compared to the previous LOD.
  • You can use fewer shaders on the LOD objects than on the original mesh.
  • The last LOD object should be at least 300 polygons. If it’s less, it won’t be recognized by the cryEngine.

Materials:

You can use any kind of Maya material you like (Lambert, Phong, Blinn, etc…).

Select every mesh making up your model. Then select the proper physics setting (in the Tools section) and click on “Assign cryShader”. This will make sure that the currently assigned Maya material gets an extra attribute related to the physics in Crysis (if you select the shader itself and scroll down to the bottom of the channelBox you’ll see the new “CryShader” attribute).

NoPhysics: The mesh will be visible but not solid – this is the default.
Physics: The mesh will be solid and visible.
Physics(NoDraw): The mesh will be solid but invisible.
NoCollide: The mesh will catch bullets but the player can walk through it.
Obstruct: The mesh will block the AI.

NoPhysics is the default for the render meshes; you should use this for the meshes you want to see in game but that don’t need to be solid (for example if you also use a simplified physics mesh).

Physics(NoDraw) is typically used for the proxy physics mesh: you want those meshes to be solid, but you don’t want to actually see them in game.

If you do not want to create a physics proxy mesh (in case your model is not very heavy), then choose Physics; The mesh will then be both visible and solid.

So to summarize: each mesh in Maya has to have one (and one only) Maya shader applied to it. But you can apply the same shader to any number of meshes. And you can name the shader anything you like (preferably something you will recognize from within Sandbox2). When you export a file (CGF or CHR), one (and only one) material file (.mtl) is created. This material file holds the list of Maya shaders that were applied to your meshes. So if you export a CGF file made of several meshes but all using the same Maya shader, one .mtl file will be created, containing only one material.

Also, please note that the materials within Sandbox 2 will always appear as a set of “submaterials”. So the top name is “NameOfYourObject”, and within that, you get a numbered list of the all the Maya shaders.

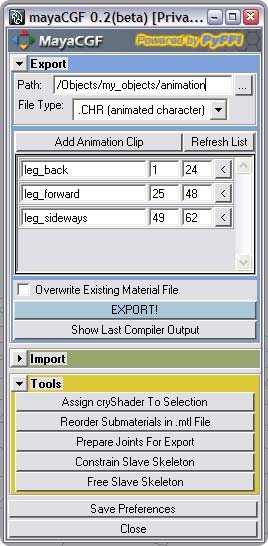
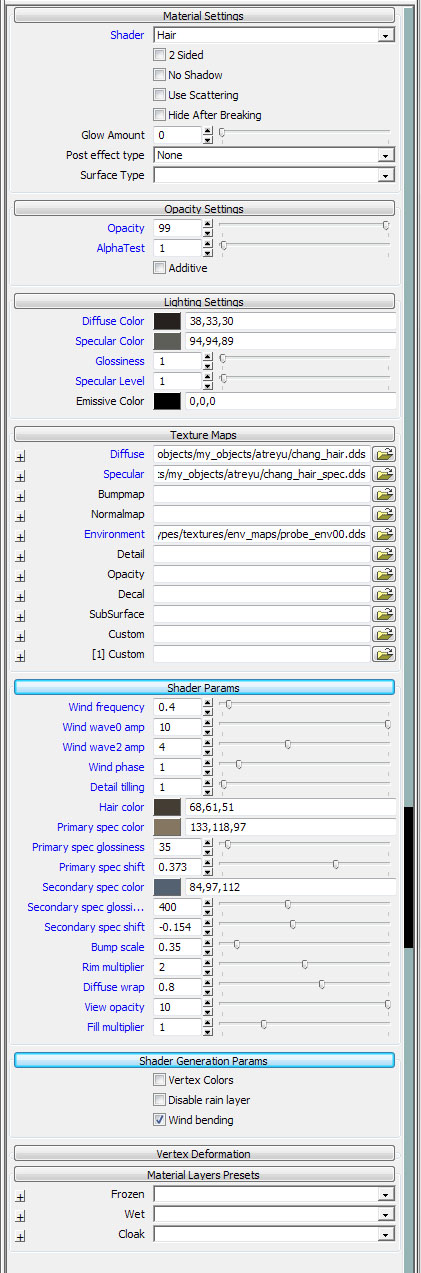
Hair (wind turbulence):

The hair turbulence is really easy to setup. It doesn’t use vertex colour but instead uses vertex alpha channel (very similar). But since it’s a bit of a pain in the butt to paint, I added a tool for that in the Tools section of MayaCGF. In a few words:

1) Select a row of vertices on the bottom of the hair strip (where the “wind” will be more noticeable).

2) In the hair section of MayaCGF, click on “2”, “3” or “4” (“5” will move a lot).

3) Repeat with the vertices further up, until you select the upper part of the hair strip and click on “0”, so that the hair that hangs along the skull doesn’t move at all.

4) Then you have to setup the hair material’s parameters within Sandbox2 (cf screenshot).

Exporting The Model:

First, choose the directory to which you want to import your static model. Remember that this directory must absolutely be located in …Crysis Wars/Game/Objects. Again, you cannot export a file to anywhere else on your hard drive!

The path that appears in the Path text input only shows a partial result. Anything before “…/Crysis Wars/Game/Objects/…” will not appear. This is to keep the path short as to be able to see the export directory at a glance. If you hover your mouse over the text field, the complete path will appear. Note that you can also right-click on the Path line to access a quick bookmarks menu that gives you instant access to the last five locations you used.

Choose “.CGF” in the “File Type” pulldown menu. Then select the top node of the model and click on “Export!”. By default, if a .mtl file already exists for the model, MayaCGF will not overwrite it, unless you check the “Overwrite .mtl File” option. But beware, if you spend time tweaking the material file within Sandbox2, you wouldn’t want to overwrite it with the default “bland” one!

When you export a static model, the following files are created:

.dae: Those are temporary Collada files; text files of your model which get compiled by the Crytek compiler to produce the actual files used by the CryEngine2.
.cgf: Binary file containing the data for the mesh (vertices, normals, etc…)
.mtl: Text file containing the material (shader information) related to a model.

Troubleshooting:

Some meshes look all stretched and warped in Maya just after I export them: This is likely because you haven’t deleted the history on that mesh prior to exporting. In some cases you can let the history be on a mesh, in some others you have to delete it. It seems to be a case-by-case situation, really.

I’m trying to export my humongous spaceship with tons of details but the .cgf file is not created: The Crytek compiler (which MayaCGF uses) is limited to 65,535 vertices (number taken from the BlueMars doc page). So try to simplify your model before exporting it again.

After I successfully export a static model composed of several different meshes, some of the meshes in Maya jumped away from their position: This is because the names of those shapes are not unique. Make sure you give a unique name to those meshes.

Some meshes are invisible in Sandbox 2 although I assigned a proper shader to them: Some meshes are probably still connected to Maya’s “initialShadingGroup”. Break the connection in the Hypergraph and remove the useless material in the .mtl file (most likely called “lambert1”).

Categories: Tags:

Exporting animated models from Maya to Crysis

September 12th, 2009 No comments

This page gives instructions about the way to export animated models (.chr files) from Maya to Crysis. Before attempting to export an animated character, you should go to this page and try to export a simple static mesh. It’s a good reading anyway, since the basic concepts are similar.

Installation instructions for MayaCGF can be found on this page.


GENERAL CONCEPTS:

1) The direct method:

If you just want to export a simple animated model and you prefer to set keys directly on the skeleton that deforms the mesh, you can go ahead and do just that.

Note that you should still select the root joint of your skeleton and click on “Prepare Joints For Export” before attempting to export a .chr file. This should be done prior to skinning or animating the joints.

2) The master/slave method:

This method offers the advantage of allowing you to work with existing custom rigs. Basically, your custom animation rig (the master skeleton) drives the export skeleton (slave skeleton) through the use of parent-constraints. The export skeleton is still the one that actually deforms the geometry. The master animation rig itself is not exported, so you can go to town with it!

Again, the skeleton that deforms the geometry (on the left in the above picture) is a slave to the animation skeleton. The simple FK slave skeleton is the one that gets exported, along with the character mesh.

Here is a diagram showing an overview of the workflow:

THE EXPORT GROUP:

The name of the exported file is the name of the group in which your mesh and export skeleton reside. So if you name that group “my_model”, the resulting exported file will be called “my_model.chr”.

Note:The mesh (and skeleton) should face the -Z direction in order for the model to show up facing forward in Crysis.

The “exclude_GRP” is a group in which you can put things that you’d like to keep within the main character group for clarity sake but that should not get exported. Again, anything you put in the exclude group will be ignored.

Note: Any hidden object will NOT get exported. Even if they are NOT in the exclude group!

THE JOINTS:

The joints which are not an influence on the mesh (not part of the skincluster) will be automatically discarded by MayaCGF at export time. So if a joint is part of your hierarchy, make sure it is also part of the binding partition. Again, as a rule of thumb, each and every joints within the export skeleton should be an influence on the skinned mesh. You can set a joint’s weights to 0 if it’s just a helper joint, but it has to be part of the influences of the skincluster. So DO NOT use “Remove Unused Influence” when optimizing your scene!

In other words, if you have a wrist joint which is parented to a forearm joint, but the forearm joint is not part of the skincluster, then the wrist (and all the joints which stem from it, like hand and finfers) will NOT be taken into account by the CryEngine2, even if THEY are part of the skincluster! This will likely wreak havoc on your model.

IMPORTANT: The root joint of your skeleton should be part of the skinCluster, but its weights should be set to 0.

After you freeze the rotations on the export joints, the values from the jointOrient attributes have to be transferred onto the corresponding rotate channels. So by default the joints influencing the mesh should have values corresponding to their actual rotation and translation in their parent-space.

To achieve this tedious task with just one click, select the root node of the export skeleton (“bip01”) and click on “Prepare Binding Joints For Export” (in the Tools section of MayaCGF).

Then you can bind the mesh to the export skeleton (set “Max Influence” to 4).

Specific to the master/slave method:

The slave joints should bear the same name as the master joints, but be prefixed with “bip01_” (or whatever prefix you input in the text field). Then you just have to parent-constrain your slave joints to the joints in your animation rig (the master skeleton). After that, you shouldn’t interact directly with the slave skeleton. Use your animation rig, the slave joints will follow!

So the next step is to parent-constrain the slave skeleton to the master (animation) skeleton. To automatically do that, you can click on “Constrain Slave Skeleton”. All you have to do is select the slave skeleton’s root joint and run the script. It will look for the master joints based on the slave joints’ name minus the prefix mentioned earlier. So it you have a joint named “bip01_L_shoulder_JNT”, the script will constrain it to an existing “L_shoulder_JNT”.

Finally, you should bind the mesh to the slave skeleton (set “Max Influence” to 4).

So to sum-up: the animation rig/skeleton drives the slave skeleton (“bip01”), which in turn drives the mesh.

PHYSICS:

If you do not want to be able to walk right through your animated model then you should also build a physics skeleton for it. Create some very simple meshes that occupy roughly the same volume as your main joints and name them according to the joint they should represent plus “_Phys” at the end. For example, for a shoulder joint named “L_shoulder_JNT” you would build a mesh called “L_shoulder_JNT_Phys”.

Note: The physics meshes won’t follow the joints movements in Maya. This is normal. If they get in the way visually, just put them in a layer and hide them. DO NOT turn their visibility off or they will not get exported!

The physics hierarchy does NOT need to perfectly match the export skeleton joints one on one. In fact it is better if it doesn’t, as the skeleton for a classic biped can hold up to a hundred joints or more. The physics meshes should be few in number and fairly simple in topology (shperes, cubes, etc…). As long as the basic hierarchy makes sense and the name convention is respected, the physics will get exported correctly.

Finally, to make the physics meshes solid in Crysis, assign a cryShader to proxy meshes (please refer to the static models instructions page). And make sure to do a “Freeze Transforms” on all the “_Phys” meshes!

MATERIALS:

If your skinned mesh needs to have multiple materials assigned to it (say skin and fabric), then first work on separate meshes, each with its own Maya shader. Finally, combine all the meshes into one unique mesh and delete its history prior to binding it to the export skeleton. The correct materials will be respected and assigned to the proper faces within Sandbox 2.

BLENDSHAPES:

You must first bind your base mesh to the skeleton and then apply all the blend shapes at once. The reason for this is that there can be only one blendShape node related to the skin cluster. So if you decide later on to add a blend shape to an already existing blend shapes set, you must first delete the existing blendShape node (not the blend shapes meshes themselves!) and then reapply all the blend shapes at once to your skinned base mesh.

IMPORTANT: All of the blendShape meshes should reside in a group (e.g.: “blendShapes_GRP”) and should be hidden before you export. If you don’t hide the blendshapes (or at least their group), they will be exported as visible geometry and Sandbox2 will probably crash when you attempt to load the .chr file.

Also note that when you export a skinned mesh with blendshapes (most likely a character’s head), you can not have any physics proxy present in the scene. The physics proxy for your character’s head should be in the body’s .CHR file. The head will then be imported as an attachment within Sandbox2.

Note: You can move your blend shapes target meshes anywhere you want in space, but make sure NOT to freeze their Translate channels, or else when you fire the target within Sandbox2, your whole mesh will jump in space as well!

LODs (Level Of Detail objects):

To setup a LOD for your animated character, start by renaming the general export node by adding “_LOD1” at the end (eg: “myModel” would change to “myModel_LOD1”). You don’t need to change anything else in the hierarchy.

Then reduce the polygon number of the mesh by 50% and finally, save the Maya scene with a different name. After that, you can export the LOD as a .CHR file, the same way you did with the original character (level 0). To export the next LOD objects, (LOD2, LOD3, etc…) simply follow the same steps again.

When you put your .CHR file in your map (as an animated geometry entity, for example), you should pick the original .CHR file, NOT any of the LODs. The CryEngine2 automatically recognizes the other existing xxx_LODx.chr files and automatically swaps them depending on the distance to the camera. It’s not really intuitive, but that’s the way it works!

Note: You must remember that contrarily to .CGF files, where the LODs can reside within the same export group as the original, the LODs for .CHR files should be saved in different Maya scenes and considered almost as different characters. As such, you should export them separately, one by one.

Some rules about LODs:

  • The maximum number of LODs allowed per exported file is 6 (usually 3 is amply sufficient).
  • Each LOD should have a poly number reduced by at least 50 percents compared to the previous LOD.
  • You can use fewer shaders on the LOD objects than on the original mesh.
  • The last LOD object should be at least 300 polygons. If it’s less, it won’t be recognized by the CryEngine2.

IMPORTANT: Be aware that LODs for animated characters (.CHR files) will not work in the Character Editor, as opposed to LODs for static models (.CGF files), which do work as you move away from the model. So the only way to check the animated LODs in action is to put your .CHR file in a map.

SETTINGS/MODEL/RIG REQUIREMENTS:

– You should work at film speed (24fps). At export time, your animation will automatically be converted to NTSC (29.97fps), which the CryEngine2 uses.

– The space unit can be set to anything (mine is on “centimeters”), but remember that one unit in Maya is equivalent to one meter in Crysis.

– To successfully export a model, it should face the world negative Z axis. The positive world X axis should point to the right of the model (to your left if you look at your model from the front). Usually, rigs and models are created with the world +X on your right and +Z towards you. So you’ll probably have to rotate your animation rig 180 degrees in Y. You’ll have to do the same for the geometry. Then don’t forget to freeze the transforms on the geometry!

– The root joint of your export skeleton should lie at the origin of the world have rotateX set to -90, rotateY to 0 and rotateZ to 90 (the other joints can be oriented any way you want, but try to avoid values neighboring 180 degrees).

– Make sure that the joints influencing the mesh do not have default values close to 180 in either rotation channel; this would result in weird flipping artifacts on those joints.

Always keep the default binding pose at frame 0 in your scene. It will be the reference frame upon which all your animations are based.

– Crysis only supports one skin cluster per character. Your multiple meshes should be combined into one single mesh and its history deleted before you bind it. However, if you combine your meshes after you skinned them, then don’t forget to do a Edit->Delete By Type->Non-Deformer History. Make sure “All non-deformer history” is the selected option.

– The number of joints influencing one vertex in the CryEngine2 is limited to 4. In consequence, when binding your mesh to the joints, set “Max Influences” to 4 or less.

– Each node (mesh, joint, etc…) in your model should have a unique name.

– You should only use parentConstraints to drive the slave skeleton (do not use point or orient constraints!).

– There should be no instanced nodes in the model.

Scale attributes on the export joints and geometry should be set to 1. Scale animation is not supported by the CryEngine 2.

– The “rotateOrder” of your deform skeleton’s joints should be “xyz“.

– The “rotateAxis” and the “jointOrient” values of the slave skeleton’s joints should be 0 (and the “rotate” channels should inherit the “jointOrient” values).

– There should only be one blendShape node present in your scene.

– Vertex color does NOT work on .CHR files (not supported by the CryEngine2). More precisely, vertices with a color value below 0.5 will appear black, while those above 0.5 won’t have any visible effect.

TROUBLESHOOTING:

If you see joints twisting or popping out of place when you play your animation in Sandbox2, it probably means those joints have values in their “jointOrient” or “rotateAxis” attributes. Those should be set to 0; the only values should be in the “rotate” channels of the joints.

Also double-check that the rotate values in your slave skeleton’s joints are nowhere near 180 degrees.

If the default pose of your model looks wrong in Sandbox 2, turn on the joints label names (in the Debug Options of the Character Editor) and make sure all the joints have been exported (they most likely haven’t).

EXPORTING ANIMATION:

Again, you should always keep the default bind pose at frame 0 and set a key on all the joints. This is the reference frame upon which the animation export is based. If you don’t do this, your model will simply explode, both in Maya and Sandbox2.

Choose the directory to which you want to export your model. Note that you can also click on the quick path menu line to access bookmarks that give you instant access to the last ten locations you used.

To export animation, first click on “Add Animation Clip” to create… an animation clip! Give it a name and set the start and end frames for the animation. Finally, select your mesh group’s top node (in the first example above that would be “ratTest”) and click on “Export!”. When you export your animated model, several files will be created (depending on the type of file exported):

.dae: Those are temporary Collada files; text files of your model which get compiled by the Crytek compiler to produce the actual files used by the CryEngine2.
.chr: Binary file containing the data for the mesh and joints (vertices, normals, weighting, etc…)
.caf: Binary file containing the animation data corresponding to a .chr file.
.cal: Text file listing the .caf animation files and the name under which they should appear in the Sandbox2 editor.
.cdf: Text file containing data regarding the character’s attachments and the way it should appear if the player picks it up in his hands, as well as attachments.
.mtl: Text file containing the material (shader information) related to a model.

If the Crytek compiler cannot compile the model you exported, the log file will appear, and you’ll be able to see what caused a problem.

LOADING YOUR MODEL IN SANDBOX2:

To see your model in Sandbox2, simply call the Character Editor window (View->Open View Panel->Character Editor) and load the .chr file. You’ll see the list of available animations on the right-hand side column. The “null” animation is created by default and is just a one-frame place-holder. Your animations should be neatly located within a folder with your model’s name.

If you want certain animations to appear within yellow folders, just add a “_” sign in the name. For example, an animation clip named “blah_walk” will appear as “walk”, within a folder named “blah”.

In order to put your animation in a level, you’ll have to create a simple Geom Entity (I called mine “geomAnim”). Then you can make a flowgraph that starts the chosen animation as you jump in game, as shown in the picture below.

Categories: Tags:

“Ghost of a Tale”

September 21st, 2008 10 comments

Here is a screenshot of a Crysis mod I’m working on (when I have time, of course). Again, I have to say that the CryEngine 2 is very impressive indeed. It allows you to fine tune the shaders and the lighting to a degree of precision that is unprecedented in the domain of video-games. And since I’m using MayaCGF, I just have to click one button to send the model from Maya to Sandbox 2 (the Crysis editor). And if I update the model in Maya, I just click the refresh button in the editor and the updated model is instantly reloaded. I’m loving it!!

Categories: crysis, update Tags:

Birch forest, anyone?

May 15th, 2008 3 comments

Taking a little break from the movie. I launched Sandbox2 again and was caught all over by the magnificent cryEngine2. That and I tried the Exodus Pine Trees pack for Crysis (you can see them in the background); they truly did an excellent job! I just tweaked the shaders to get something a little bit more realistic looking, but they’re a pleasure to watch.

And so I thought I’m going to make some trees! The birch is a very peculiar (and recognizable) tree, so I got some source material from the web and went to work. The difficult part is that I had to add support for colored vertices in the Maya exporter; that’s indispensable if you want your leaves to blow in the wind in a convincing way. I think I’ll probably write a tutorial at some point on how to make a tree for Crysis in Maya.

Categories: crysis, misc, update Tags:

MayaCGF: A tool to import/export models between Maya and Crysis

March 5th, 2008 No comments

-> MayaCGF is discontinued as of July 10th 2011 <-

-> Support for the CryEngine3 (Crysis 2) can be found HERE! <-

This page will help you download and install MayaCGF, which is a plugin for Maya allowing you to import and export models to Sandbox 2 (the Crysis editor).

  • For instructions on how to export static models, go to this page.
  • For instructions on how to export animated characters, go to this page.

mayaCGF

DOWNLOAD:

Updated on 20 January 2011: Beta 0.6

– Fixed a common bug happening with the “Combine” option.

– Fixed symmetry edges appearing “hard” on CHR files while they appear “smooth” as a CGF file (requires the latest Collada plugin for Maya).

– Vertex colors now use Collada plugin internal code, resulting in faster export.

– Specular and normal maps are now correctly exported in the .mtl file.

(You can find the rest of the changes history at the bottom of the page)

SUPPORTED FEATURES:

  • CGF files (static models)
  • CHR files (animated characters)
  • Physics proxy (both for static and animated models)
  • LOD (Level-of-Detail) objects
  • Blend shapes (morph targets)
  • Vegetation (detail-bending, trees with breakable trunks, etc…)
  • Breakable objects (trees, props, etc…)
  • Hair (with wind intensity)

UNSUPPORTED FEATURES:

  • CGA files (rigid animated models).

COMPATIBILITY:

MayaCGF is compatible with both the 32 bit and 64 bit versions of Maya 2008, 2009, 2010 and 2011. Earlier versions of Maya are not (and will never be) supported.


INSTALLATION:

First, uninstall and delete any previous version of MayaCGF and ColladaCGF. That includes scripts in My Documents/maya20xx/scripts and C:/Program Files/Autodesk/Maya20xx/Python/lib/site-packages.

1) Install the OpenCOLLADA plugin for Maya: http://www.opencollada.org/download.html. MayaCGF has been successfully tested with version 1.3.0. Any other Collada plugin, including the previous versions of “Collada NextGen Exporter” or the Feeling Software plugin will NOT work!

2) Install MayaCGF.

3) (Optional: This is only required if you want to import models from Crysis into Maya) Install PyFFI: http://sourceforge.net/projects/pyffi/files/.

Finally, type the following line in the scrip editor (in the MEL tab) to launch MayaCGF:

source "mayaCGF.mel"; mayaCGF;

In addition, the installer will create a couple of Maya sample scenes for testing purpose, which can be found in C:\Program Files (x86)\MayaCGF\sample_scenes.

TROUBLESHOOTING:

If you’re on a 64bit OS (xp, Vista or 7), make sure that there is a folder called “20xx-x64” in your “Documents” folder, and not just a “20xx” folder. Sometimes it is not automatically created when installing Maya 64 bit and that can be a problem. For example, if you run a 64 bit version of Maya, the Maya folder in your Documents should be called “20xx-x64“. For a 32 bit version, it should be called “20xx“.

Also, before installing a new version of MayaCGF, it is advised to uninstall the current version first. Make sure that the following files are actually deleted:

  • …/My Documents/maya20xx/scripts/mayaCGF.mel
  • C:/Program Files/Autodesk/Maya20xx/Python/Lib/site-packages/cgf_import.py and cgf_export.py

Textures don’t appear when importing an object in Maya: You have to respect the hierarchy of the Crysis (Warhead) “Objects” directory in which the object is located. If you don’t do this, the textures will not appear in Maya.

HISTORY:

Beta 0.5a:

– Fixed an export bug with the “Combine” option when invisible meshes were present in the hierarchy.

– Removed a pointless warning when using the “Combine” option.


Beta 0.5:

– Fixed a bug that caused some animations to be cut before the end. Animation export is now frame-accurate.

– Fixed faulty interpolation when playing animations in slow-motion in Sandbox2 (no more jerky motion).

– Added a “Combined” export mode that reduces exported .CGF files size by almost 50%.

– Trees physics proxies are now fully supported (when using the “Combined” mode).

– Added vertex color related buttons to the Tools section.


Beta 0.4c:

– Fixed an import bug linked to the new version of PyFFI.

– Fixed a bug that caused blendshapes to appear warped (mostly flattened) in Sandbox2.


Beta 0.4b:

– MayaCGF can now export meshes with multiple shaders assigned to them.

– Fixed a bug that sometimes caused the blendshapes to be ignored.

– Fixed a “‘NoneType’ object is not iterable” bug.

– The log file is now located in the official user temp directory (instead of disk C:).

– Fixed a bug regarding the progress window’s deletion.


Beta 0.4a:

– Fixed a nasty bug that made Maya crash when adding an animation clip.

– Animation export is now faster (10-20%) and simpler behind the scenes (no more flimsy constraints baking).

– Skin mesh is now correctly identified in case of multiple meshes present in the export group.

– Physics are now correctly ignored if the root physics mesh is hidden or inside the exclude group.

– Clicking on animation clip button now toggles between clip frame range and frame 0 (binding pose).

– Added better feedback on overall progress and export steps.


Beta 0.4:

– Added support for Maya 2011.

– Instances of meshes are now allowed and properly recognized.

– Fixed a big bug in “Reorder Materials”; the tool now works again.

– Fixed error log opening twice in case of error.


Beta 0.3e:

– Fixed a bug when importing .CDF files. The attachment paths would not be correctly parsed if the “objects” folder was not capitalized.

– Transforms with non-unique names residing in the “exclude_GRP” shouldn’t stop the export process anymore.

– If a mesh is connected to the initialShadingGroup on top of another shader (a case of “parasitic” connection), MayaCGF will attempt to break the connection before export.


Beta 0.3d:

– Removed the “Shape” suffix that was automatically appended at the end of the blendshapes’ names.

– Fixed a bug that made MayaCGF crash when attempting to export a file with a blendshape node selected.

– Removed the useless error messages spat by the Collada exporter complaining about constraints.


Beta 0.3c:

– Static models (.CGF) do not need to have their history deleted prior to export anymore.

– Fixed a bug that caused the last frame of animation to be ignored (and caused a visible pop with looping cycles).

– Fixed a bug that happened when attempting to export with the top node selected.

– Transforms in the exlude_GRP can now have values in their transform channels: it won’t interfere with the export process anymore.

– The import scale has been fixed: an imported model at scale 1.0 will comply to the 1 Maya unit = 1 Crysis meter rule.

– Enforced removal in the filtered Collada file of geometries located in the exclude_GRP.

– When creating a cryAnimation clip, the default values are now based on the current time range.

– Fixed a bug that made MayaCGF crash when canceling the export process.

– Exported .CGF models’s orientation now matches the official Crysis one (different from the .CHR).

– Fixed “Constrain Slave Skeleton” procedure: all the slave joints are now properly taken into account.

– The time and value accuracy of exported animations within Sandbox 2 now reflects precisely Maya’s.

– MayaCGF version is now included in the filtered Collada file.


Beta 0.3b:

– Fixed a couple of bugs regarding vertex color and alpha value accuracy.

– User can now export with vertices selected without having to first select a transform.

– Hair support has been added in the UI (using vertex color/alpha channel values).

– Exported file names now respect the case-sensitivity of the exported node.


Beta 0.3a:

– Animation export is now from 2 to 4 times faster (depending on animation clip length).

– Added full vertex color support (independent from OpenCOLLADA plugin).

– Fixed a bug with wrong animation export range (too short).

– Invisible nodes (not exported) do not have to have their transforms frozen before export.

– Fixed animation names being duplicated in the .cal file.

– The physical state of exported meshes is now set to solid by default (in case no cryShader has been assigned).

– Added preliminary support for .fsq (facial sequence animation).


Beta 0.3:

– Added support for blend shapes/morph targets (yay for facial animation!).

– Fixed a bug that happened when exporting a skeleton made up of just one joint.

– Fixed a silly bug that caused the joint prefix textField to systematically reverse to 0.

– Added a blend shape example Maya scene.

– Locators and annotations do not need to have their translate values set to 0 anymore.


Beta 0.2g:

– Fixed a bug introduced in the previous version that caused the export of animated models to fail.

– Users can now name the joints the way they want: the limitation of having to use a specific “bip01” prefix (when not using the master/slave method) has been removed.

MayaCGF now warns the user prior to exporting if some meshes have values other than 0 in their transform channels.

– MayaCGF now warns the user if a mesh is connected to more than one shadingGroup. This keeps the material order from changing unexpectedly.

– The default specular value of an exported .mtl file now accurately reflects the specular color of the Maya shader.

– The animated arm sample scene has been updated.

– Annotation locators are now allowed, as long as they don’t interfere with the hierarchy.


Beta 0.2f:

– User can now export to any arbitrary directory (not just “…/Crysis (Wars)/Game/Objects”).

– Greatly improved path bookmark system with 10 slots available to quickly navigate between frequently used directories.

– User is now warned if a file was actually compiled albeit with engine-breaking errors (which result into the Dreaded Yellow Ball). Before, MayaCGF only cared if the file was compiled at all.

– The default diffuse color for an exported object is now much brighter (instead of muddy brown/gray).

– Bug fixed where some meshes would jump in space after a successful export (caused by bad handling of multiple meshes with the same name).

– The export group (the top node) ‘s translate values are now automatically set to zero at export time. This lets the user move the top node anywhere in space and export from there without having to manually bring back the node to the world’s origin before exporting.

– Fixed a bug about non-unique names not being properly detected .

– Fixed a wrong export option flag that caused the textures to be all garbled.


Beta 0.2e:

– Fixed: The bug that happened while trying to import some architectural models (out-of-range index error) has been fixed.

– Added: MayaCGF now prints out a warning about meshes on which history has not been deleted (for static models).

– Added: The user can now choose and assign a cryShader physics directly from the Tools section (no need for manually selecting the material anymore).


Beta 0.2d:

– Fixed: Import now works even if the object is not located in the official Crysis (Warhead) directory.


Beta 0.2c:

– Fixed: On 64bit systems the .mtl file would often get overwritten at export time with default brown material (even though the user unchecked the “Overwrite Existing Material File” check box).

– Fixed: Sometimes the “Assign cryShader To Selection” tool would error out when multiple geometries with the same shape names existed in the scene.

– Added: There is now a new tool called “Run MayaCGF Diagnostic” that should help when trying to pinpoint some bugs’ origin.


Beta 0.2b:

– Fixed: The installer now properly recognizes 64 bit versions of Maya (thanks Amorilia!).

– Fixed: The import function was broken and is now fixed.

Beta 0.2a:

– Added: Checking for consistency between shape name and transform name for the physics proxy meshes.


Beta 0.2:

– Updated: The animation batch export process is now up to 50% faster (depending on the number of joints and clips).

– Fixed: Added a check for consistency between physics shape names and their own transform name. User is warned to correct the discrepancies.

– Fixed: Installer was not copying the Python files to the right folder. Duh!

– Added: Better check for public/private status.


Beta 0.1z:

– Added: MayaCGF now comes with an installer.

– Added: Preliminary support for batch animation export.

– Updated: The UI now dynamically adapts and re-sizes to the type of files being exported.

– Fixed: MayaCGF no longer triggers a harmless error message at launch time if PyFFI is not installed.


Beta 0.1x:

– Added: All the Crysis physics shaders are now supported.

– Fixed: The default Diffuse Color is now medium gray instead of pitch black.

– Added: You can now right-click on the Path line to access a quick bookmarks menu that gives you instant access to the last five locations you used.

– Removed: Translate, Rotate and Scale options have been removed, since the Resource Compiler doesn’t understand scale animations (and translate and rotate are a given).

– Added: Assign cryShader (in the Tools section) now allows user to set the physics properties directly on the Maya shaders.

– Fixed: Better check-up to make sure the export file is actually created, in case a file with the same name already existed in the same location.

– Fixed: MayaCGF now handles gracefully a few more error situations while giving better feedback.

– Fixed: Better handling of .mtl overwrite using genuine Resource Compiler flag.

– Added: Banner picture for MayaCGF.

– Updated: Test scenes for .chr and .cgf models.


Beta 1w:

– Fixed: MayaCGF now properly checks if the mesh is a skin before attempting to export a .chr file.

– Fixed: The Prepare Joints procedure now correctly orients the root joint.


Beta 1u:

– Fixed: Stupid bug trying to call ColladaCGF (ColladaCGF is NOT needed for the MayaCGF beta and should NOT be installed).


Beta 1t:

– Fixed: .cgf export (for static models) now works also on skinned geometry.

– Added: The export folder is now created if it does not already exist.


Beta 1s:

– Fixed: MayaCGF was crashing when trying to export a .cgf file.

– Added: MayaCGF now warns the user if the geometry is not located within a group.


Beta 1r:

– Fixed: MayaCGF was crashing when trying to export a file if there were no physics meshes. Duh!

– Fixed: The Prepare Joints procedure now automatically assigns a proper rotation to the root joint (-90, 0, 90).


Beta 1q:

– Added: Support for physics (yay!).

– Added: You can now export an animated model by directly keying the binding skeleton joints (you don’t have to use the master/slave method). Note that the slave/master method is still (and will remain) supported.

– Fixed: You can now use any kind of shader on your mesh.

– Fixed: The color of shaders (Diffuse) is now properly reflected in the .mtl file.

– Added: Included all the helping scripts in the main UI under new Tool section.

– Fixed: Prepare Joints script would get confused if multiple joints with the same name existed.

– Added: In case of failure to export, the compiler export log is called.


Beta 1j:

– Fixed: Bug on Maya 2008 and 2009 when exporting animated characters.

– Fixed: Rewrote the “reorder materials” proc in Python and added option to remove submaterials.

– Fixed: Bug related to baking keys when exporting animation.

– Fixed: Bug that caused some materials to be ignored at compile time.

– Fixed: The .chr file was not created when exporting an animated character.

Categories: Tags: